Melted Snowman Bark is an easy Christmas candy made with a white candy base, peanut butter cup hats, pretzel arms, and colorful decorations. Each piece looks like a snowman melting into a snowy puddle, complete with a crooked hat and scattered buttons. Creamy sweetness, chocolate-and-peanut-butter flavor, and crunchy pretzels make these individual treats a cheerful addition to holiday platters and homemade gift boxes.
Recipe at a Glance
| Detail | Amount |
|---|---|
| Preparation and melting | Approximately 25 minutes |
| Baking | None |
| Setting time | Approximately 15 minutes; may take longer |
| Total time | Approximately 40 minutes |
| Yield | 10 individual snowmen |
| Equipment | Baking sheet, wax or parchment paper, microwave-safe bowl, spoon, spatula, and knife |
An adult should handle the knife, hot bowl, and melted coating. Children can help organize the decorations and decorate with supervision.
Why You’ll Love This Melted Snowman Bark
- No oven needed: Simply melt, spoon, decorate, and let set.
- Easy decorating: Uneven puddles and tilted hats suit the melted-snowman design.
- Individual portions: Each snowman is made separately, so there’s no need to break a decorated sheet.
- Great for gifting: Package the completely set pieces in food-safe bags or small treat boxes.
Ingredients for Melted Snowman Bark
For the White Base
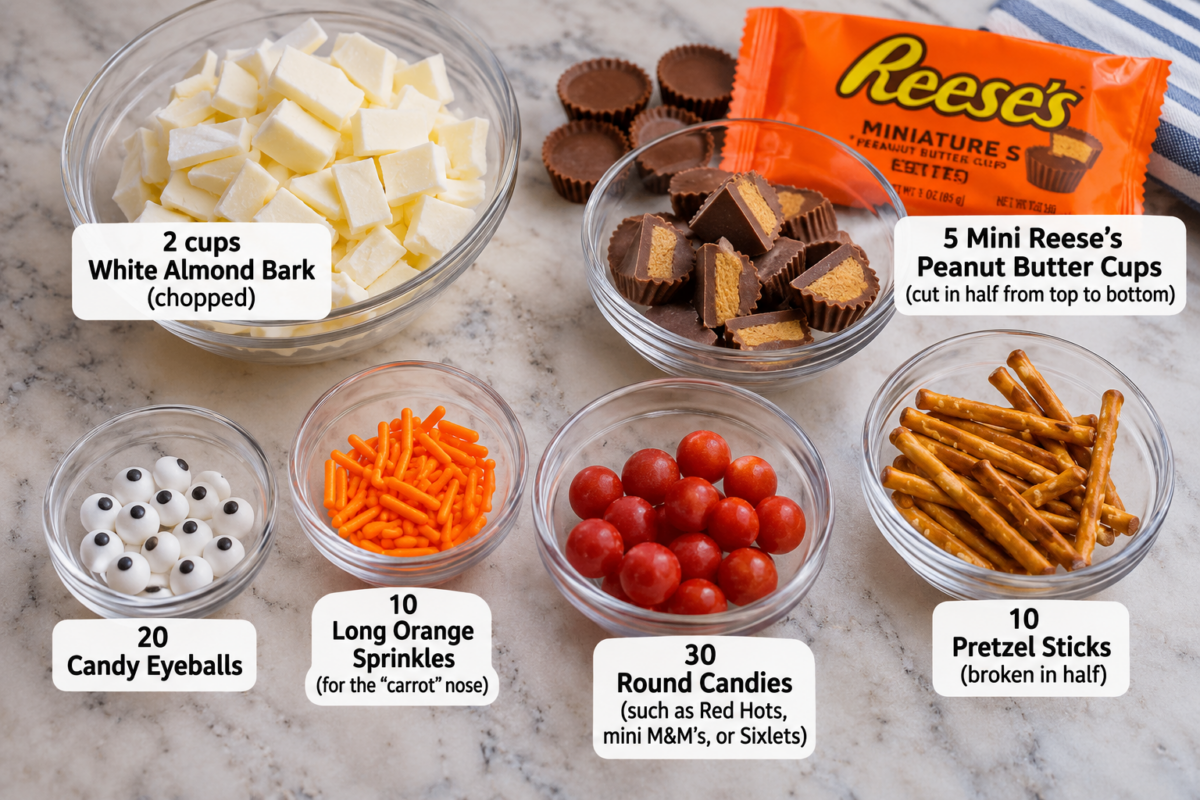
- 2 cups white almond bark, chopped, or white chocolate chips
For the Decorations
- 5 mini Reese’s peanut butter cups, cut in half vertically
- 20 candy eyeballs
- 10 long orange sprinkles, for the noses
- 30 small round candies, such as mini M&M’s, for the buttons
- 10 pretzel sticks, broken in half
Ingredient Notes and Substitutions
White almond bark: Choose the white confectionery coating intended for melting and dipping. Follow its package instructions for melting and setting.
White chocolate chips: These can replace the almond bark, but melting consistency and firmness after cooling vary by product. Allow additional setting time when necessary.
Peanut butter cups: Each half makes one hat. Unwrap and cut them before melting the base so you can decorate without stopping.
Candy buttons: Red and green candies give the snowmen a Christmas theme. Other colors work with the same method.
Pretzel sticks: Break each stick into two arms. Slightly uneven lengths add character.
How to Make Melted Snowman Bark
Step 1: Prepare the Tray and Decorations
Line a baking sheet with wax paper or parchment paper and place it on a level surface.
Cut the peanut butter cups, break the pretzels, and sort the remaining decorations. Each snowman needs two eyes, one orange nose, one hat, three buttons, and two pretzel arms.
Step 2: Melt the White Base
Place the chopped almond bark in a completely dry microwave-safe bowl.
Follow the package directions. If permitted by the manufacturer, microwave in intervals of up to 30 seconds, stirring thoroughly after each interval. Shorten the intervals as the coating melts.
Stop heating when only a few small pieces remain, then stir until smooth. For white chocolate chips, follow the package’s recommended power level and heating intervals.
Keep the bowl and utensils dry. Moisture can make melted chocolate grainy, while excessive heat can scorch it. Hersheyland
Step 3: Shape One Puddle
Spoon a portion of melted coating onto the lined tray. Spread it into an irregular puddle approximately ¼ inch thick.
Plan to divide the coating into about 10 pieces, leaving space between them. Keep the edges substantial enough to lift without breaking.
Step 4: Decorate Immediately
Place two candy eyes and an orange sprinkle near the upper portion of the puddle.
Add a peanut butter cup half above the face, resting its cut side against the coating. Arrange three candy buttons below the face and a pretzel arm on each side.
Press each decoration gently into the soft coating. A slightly tilted hat and off-center buttons give the snowman its melted appearance.
Step 5: Repeat With the Remaining Coating
Finish decorating one snowman before spooning the next puddle. This helps prevent the surface from setting before the decorations are attached.
For more decorating time, melt and use half the coating first, then repeat with the remaining half.
Step 6: Let the Snowmen Set
Leave the tray undisturbed until the pieces are firm throughout. Allow approximately 15 minutes, although the coating, thickness, and room temperature may affect setting time.
If the underside feels soft or the piece bends, give it longer. Once firm, carefully peel the paper away from the base.
Tips and Troubleshooting
| Problem | Likely cause | Practical solution |
|---|---|---|
| Decorations fall off | The surface set before they were attached | Use a small dab of melted coating to secure them |
| Snowmen crack when lifted | Thin edges or incomplete setting | Allow more setting time and peel away the liner gently |
| The coating sets during decorating | Too many puddles were shaped at once | Make and decorate one snowman at a time |
| Chocolate becomes grainy | Moisture or overheating | Use dry tools and follow the product’s melting instructions |
| Pieces remain soft | Warm conditions or the chosen chocolate | Move to a cooler location and follow the product’s setting guidance |
Handle the white base when moving the snowmen. The pretzel arms and candy hats are more fragile.
Recipe Variations
Change the button colors: Choose matching red-and-green buttons or give every snowman a different combination.
Make smaller snowmen: Spoon smaller puddles for more individual pieces. Have extra decorations ready, since the listed quantities decorate 10 snowmen.
Create different expressions: Place the eyes closer together, tilt the hats, or scatter the buttons slightly. Keep the face recognizable while varying the arrangement.
What to Serve With Melted Snowman Bark
Arrange the snowmen in a single layer on a white platter, leaving their faces and pretzel arms visible. Serve alongside ginger cookies, chocolate peanut clusters, or mugs of hot chocolate.
For gift boxes, let every piece set completely before packing. Separate stacked layers with parchment paper and leave enough room to protect the hats and arms.
Storage and Make-Ahead Tips
Store the completely set bark in an airtight container in a cool, dry place, away from sunlight and warm appliances. Cool, dry storage also helps protect the appearance of chocolate decorations.
Prepare the decorations ahead by cutting the hats, breaking the pretzels, and sorting the candies. Keep everything covered and dry until assembly.
If the room is too warm, refrigerate the bark in a sealed container. Allow the closed container to warm toward room temperature before opening to help limit condensation.
Freezing is optional, but moisture during thawing may affect the finish and pretzel crunch. No reheating is needed.

Frequently Asked Questions
Is melted snowman bark made as one large sheet?
This version uses individual puddles. Each snowman stays intact without cutting or breaking through the decorations.
Can I use white chocolate chips instead of almond bark?
Yes. Follow the instructions for your chosen chips, and expect possible differences in melting texture and setting time.
Do I need a snowman mold?
No. A spoon and a lined baking sheet are enough. Irregular edges are part of the design.
Can I leave out the peanut butter cup hats?
Yes. The eyes, orange noses, candy buttons, and pretzel arms still create recognizable snowmen. If changing ingredients because of an allergy, check all ingredient labels.
More Holiday Treats to Try
Complete your holiday platter with chocolate peanut clusters, soft ginger cookies, or no-bake chocolate cookies.
Which snowman decoration would you choose first: a tilted chocolate hat or bright candy buttons? Share your favorite combination in the comments.