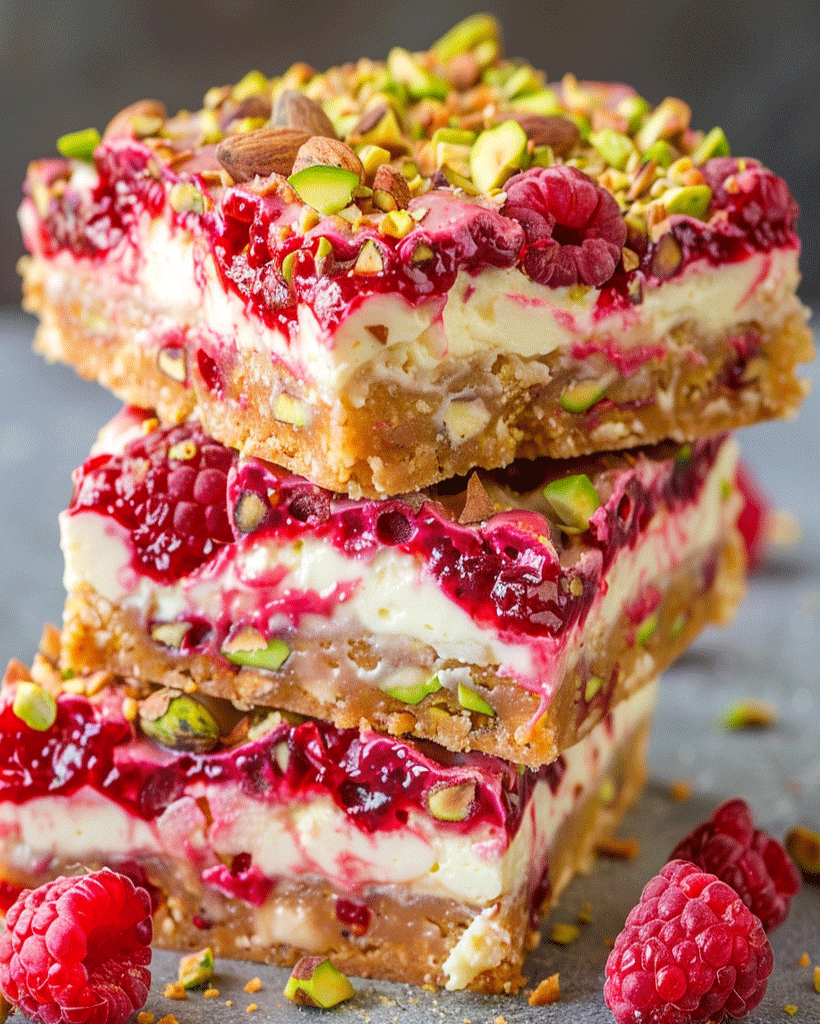
Welcome to a delightful dessert experience that’s about to change your baking game! If you’re a fan of rich, creamy cheesecake with layers of fresh fruit and a nutty crunch, these Creamy Raspberry Pistachio Layered Cheesecake Bars are a must-try. With every bite, you’ll savor the perfect harmony of sweet raspberries, velvety cream cheese, and the nutty goodness of pistachios. Whether you’re a seasoned baker or someone who enjoys quick and easy desserts, this recipe is for you!
Introduction
Cheesecake has always been a go-to dessert for many, but when you combine it with a crunchy pistachio base and a sweet raspberry swirl, it becomes truly exceptional. The flavors in these Creamy Raspberry Pistachio Cheesecake Bars are inspired by the blend of tart, sweet, and creamy textures often found in European desserts. This recipe is easy to make, and the result is a rich and decadent treat that’ll impress your friends and family. It’s the perfect dessert for any occasion—whether you’re hosting a dinner party or just craving a comforting dessert at home.
Ingredients for Creamy Raspberry Pistachio Layered Cheesecake Bars
To make this delicious treat, you’ll need:
- 1 1/2 cups graham cracker crumbs – for the classic cheesecake crust
- 1/2 cup melted butter – to bind the crust together
- 1/2 cup finely chopped pistachios – adds a nutty crunch to the base, plus more for garnish
- 8 oz cream cheese, softened – the creamy base for the cheesecake layer
- 1/3 cup sugar – adds sweetness to the cream cheese mixture
- 1/4 cup honey – enhances the flavor with a touch of natural sweetness
- 1 teaspoon vanilla extract – for that warm, fragrant flavor
- 1 large egg – binds the cheesecake layer for a smooth texture
- 1/2 cup fresh raspberries – adds tartness and bursts of flavor
- 1/3 cup raspberry preserves – for a sweet raspberry swirl
- 1/2 cup sweetened condensed milk – adds richness and creaminess
Optional substitutions:
- Use gluten-free graham crackers for a gluten-free version.
- Replace pistachios with walnuts or pecans if you prefer a different nut flavor.
- Swap out fresh raspberries for blackberries or blueberries to change up the fruit profile.
How to Make Creamy Raspberry Pistachio Layered Cheesecake Bars – Step by Step
Step 1: Prepare the Crust
To start, preheat your oven to 350°F (175°C) and line an 8×8-inch baking dish with parchment paper, leaving an overhang for easy removal later. In a medium bowl, combine the graham cracker crumbs, melted butter, and finely chopped pistachios. Stir until the mixture resembles wet sand. Press this crust mixture firmly into the bottom of the prepared baking dish to create an even layer.
Tip: Using the back of a spoon or a flat-bottomed cup helps achieve a perfectly smooth crust. This is the base that holds everything together, so make sure it’s tightly packed!
Step 2: Make the Cheesecake Filling
In a large bowl, beat together the softened cream cheese, sugar, honey, and vanilla extract until the mixture is smooth and creamy. Add the egg and continue beating until just combined, avoiding overmixing. This will give you the luscious, creamy cheesecake layer.
Step 3: Layer the Cheesecake
Once the cheesecake filling is ready, spread it evenly over the pistachio-graham cracker crust. Smooth the top with a spatula to ensure an even layer. Next, drop spoonfuls of the raspberry preserves onto the cheesecake layer. Using a knife or a toothpick, gently swirl the preserves into the cream cheese mixture to create beautiful raspberry swirls.
Step 4: Add Fresh Raspberries and Condensed Milk
Sprinkle the fresh raspberries evenly across the top of the swirled cheesecake layer. Finally, drizzle the sweetened condensed milk over the entire surface. This will add an extra layer of richness and sweetness to the cheesecake bars.
Step 5: Bake to Perfection
Place the baking dish in the preheated oven and bake for 25–30 minutes, or until the cheesecake is set and the edges are lightly golden. Once baked, remove from the oven and let the bars cool completely at room temperature. After cooling, refrigerate the bars for at least 1 hour to allow the flavors to set and the cheesecake to firm up.
Step 6: Garnish and Serve
Before serving, sprinkle extra chopped pistachios on top for added texture and a pop of color. Cut into bars and enjoy!
Helpful Tips for Creamy Raspberry Pistachio Layered Cheesecake Bars
- Use softened cream cheese: Make sure the cream cheese is at room temperature before mixing. This ensures a smooth, lump-free filling.
- Swirl for a perfect look: Don’t over-swirl the raspberry preserves; a few gentle swirls will create a marbled effect and prevent the layers from mixing too much.
- Cool before cutting: Let the bars cool completely before cutting them to ensure clean slices. This prevents the filling from becoming too soft and messy.
- Add a citrus twist: For a hint of brightness, you can add the zest of one lemon or lime to the cheesecake mixture.
Cooking Tips for the Best Raspberry Pistachio Cheesecake Bars
- Chill time is key: Allowing the bars to chill after baking is crucial. This step firms up the cheesecake layer and enhances the flavors.
- Sharp knife for cutting: Use a sharp knife and wipe it between cuts to get clean, professional-looking bars.
- Equipment tips: Use a stand mixer or hand mixer for smooth blending. A food processor works great for crushing graham crackers if you don’t have store-bought crumbs.
- Best pistachio hacks: Buy shelled pistachios to save prep time. Toasting the pistachios before chopping brings out their flavor and gives the bars an extra crunchy texture.
Serving Suggestions for Creamy Raspberry Pistachio Cheesecake Bars
These Raspberry Pistachio Cheesecake Bars are a versatile dessert that can be served on any occasion. Pair them with:
- A dollop of whipped cream: For extra creaminess, add a scoop of fresh whipped cream on the side.
- Fresh raspberries and mint leaves: These garnishes not only add a burst of color but also enhance the fruity flavor.
- Vanilla bean ice cream: A scoop of ice cream pairs perfectly with the creamy texture of these bars, making them an even more indulgent treat.
- Hot tea or coffee: The richness of the cheesecake pairs wonderfully with a warm beverage like green tea, chamomile, or a freshly brewed coffee.
Nutritional Information
These Raspberry Pistachio Cheesecake Bars offer a combination of indulgence and wholesome ingredients. Let’s take a closer look at their nutritional value.
Nutritional Information (per serving)
- Calories: 280
- Total Fat: 18g
- Saturated Fat: 9g
- Cholesterol: 55mg
- Sodium: 140mg
- Total Carbohydrate: 25g
- Dietary Fiber: 2g
- Sugars: 18g
- Protein: 5g
- Vitamin A: 8% DV
- Vitamin C: 10% DV
- Calcium: 6% DV
- Iron: 4% DV
Storage and Leftovers for Raspberry Pistachio Cheesecake Bars
If you have leftovers (which is rare because they’re so delicious!), here’s how you can store and enjoy them later.
- Refrigeration: Store the cheesecake bars in an airtight container in the refrigerator for up to 4 days. This will keep them fresh and maintain the creamy texture.
- Freezing: For longer storage, wrap individual bars in plastic wrap and place them in an airtight container or freezer bag. Freeze for up to 2 months. To serve, simply thaw the bars in the refrigerator overnight.
- Reheating: While these bars are best served chilled, you can enjoy them at room temperature as well. Simply let them sit out for about 10-15 minutes before serving if frozen.
Frequently Asked Questions (FAQs) for Raspberry Pistachio Cheesecake Bars
- Can I make these bars ahead of time? Absolutely! These cheesecake bars taste even better the next day. You can make them a day ahead and refrigerate until ready to serve.
- Can I use frozen raspberries instead of fresh? Yes, you can use frozen raspberries, but make sure to thaw them and drain any excess liquid to prevent the bars from becoming too soggy.
- How do I make the crust gluten-free? Simply use gluten-free graham crackers for the crust, and you’ll have a delicious gluten-free version of these cheesecake bars.
- What can I use instead of pistachios? You can substitute pistachios with almonds, walnuts, or pecans, depending on your preference or dietary needs.
Related Recipes for Raspberry Pistachio Cheesecake Bars Lovers
If you loved this recipe, here are two more delicious desserts you’ll enjoy:
Conclusion
There’s something undeniably irresistible about these Creamy Raspberry Pistachio Layered Cheesecake Bars. The combination of nutty pistachios, tangy raspberries, and creamy cheesecake makes for a dessert that’s both sophisticated and crowd-pleasing. Whether you’re making them for a special occasion or just because, you’ll find yourself coming back to this recipe time and time again. Try it out, and let us know how it turned out in the comments! Happy baking!
Print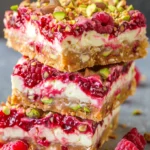
Raspberry Pistachio Cheesecake Bars – Creamy & Delicious
Description
Welcome to a delightful dessert experience that’s about to change your baking game! If you’re a fan of rich, creamy cheesecake with layers of fresh fruit and a nutty crunch, these Creamy Raspberry Pistachio Layered Cheesecake Bars are a must-try. With every bite, you’ll savor the perfect harmony of sweet raspberries, velvety cream cheese, and the nutty goodness of pistachios. Whether you’re a seasoned baker or someone who enjoys quick and easy desserts, this recipe is for you!
Ingredients
- 1 1/2 cups graham cracker crumbs – for the classic cheesecake crust
- 1/2 cup melted butter – to bind the crust together
- 1/2 cup finely chopped pistachios – adds a nutty crunch to the base, plus more for garnish
- 8 oz cream cheese, softened – the creamy base for the cheesecake layer
- 1/3 cup sugar – adds sweetness to the cream cheese mixture
- 1/4 cup honey – enhances the flavor with a touch of natural sweetness
- 1 teaspoon vanilla extract – for that warm, fragrant flavor
- 1 large egg – binds the cheesecake layer for a smooth texture
- 1/2 cup fresh raspberries – adds tartness and bursts of flavor
- 1/3 cup raspberry preserves – for a sweet raspberry swirl
- 1/2 cup sweetened condensed milk – adds richness and creaminess
Optional substitutions:
- Use gluten-free graham crackers for a gluten-free version.
- Replace pistachios with walnuts or pecans if you prefer a different nut flavor.
- Swap out fresh raspberries for blackberries or blueberries to change up the fruit profile.
Instructions
Step 1: Prepare the Crust
To start, preheat your oven to 350°F (175°C) and line an 8×8-inch baking dish with parchment paper, leaving an overhang for easy removal later. In a medium bowl, combine the graham cracker crumbs, melted butter, and finely chopped pistachios. Stir until the mixture resembles wet sand. Press this crust mixture firmly into the bottom of the prepared baking dish to create an even layer.
Tip: Using the back of a spoon or a flat-bottomed cup helps achieve a perfectly smooth crust. This is the base that holds everything together, so make sure it’s tightly packed!
Step 2: Make the Cheesecake Filling
In a large bowl, beat together the softened cream cheese, sugar, honey, and vanilla extract until the mixture is smooth and creamy. Add the egg and continue beating until just combined, avoiding overmixing. This will give you the luscious, creamy cheesecake layer.
Step 3: Layer the Cheesecake
Once the cheesecake filling is ready, spread it evenly over the pistachio-graham cracker crust. Smooth the top with a spatula to ensure an even layer. Next, drop spoonfuls of the raspberry preserves onto the cheesecake layer. Using a knife or a toothpick, gently swirl the preserves into the cream cheese mixture to create beautiful raspberry swirls.
Step 4: Add Fresh Raspberries and Condensed Milk
Sprinkle the fresh raspberries evenly across the top of the swirled cheesecake layer. Finally, drizzle the sweetened condensed milk over the entire surface. This will add an extra layer of richness and sweetness to the cheesecake bars.
Step 5: Bake to Perfection
Place the baking dish in the preheated oven and bake for 25–30 minutes, or until the cheesecake is set and the edges are lightly golden. Once baked, remove from the oven and let the bars cool completely at room temperature. After cooling, refrigerate the bars for at least 1 hour to allow the flavors to set and the cheesecake to firm up.
Step 6: Garnish and Serve
Before serving, sprinkle extra chopped pistachios on top for added texture and a pop of color. Cut into bars and enjoy!
Equipment

2Pcs Heart Shape Cake Pans, Aluminum Heart Cake Mold, Reusable 10 inch
Buy Now →
Kids Chill Leak-Proof Lunch Box – Included Reusable Ice Pack Keeps Food Cold
Buy Now →Notes
- Use softened cream cheese: Make sure the cream cheese is at room temperature before mixing. This ensures a smooth, lump-free filling.
- Swirl for a perfect look: Don’t over-swirl the raspberry preserves; a few gentle swirls will create a marbled effect and prevent the layers from mixing too much.
- Cool before cutting: Let the bars cool completely before cutting them to ensure clean slices. This prevents the filling from becoming too soft and messy.
- Add a citrus twist: For a hint of brightness, you can add the zest of one lemon or lime to the cheesecake mixture.
