Caramel Chocolate Crunch Bars | Easy Dessert Treats are a layered shortbread dessert with caramel, chocolate, and optional nuts that takes just 37 minutes and yields 16 bars at $1.18 per serving. These indulgent bars start with a buttery pressed crust made from only 7 pantry-friendly ingredients, then get blanketed in bubbling caramel sauce and two kinds of chocolate for a treat that tastes far more complex than the effort involved. With a 15-minute prep time and a 22-minute bake, they’re ready to cool in well under an hour — perfect for last-minute dessert emergencies.
Prep Time
Cook Time
Total Time
Servings
8
Calories
482 kcal per serving
Cost/Serving
$1.18
Difficulty
Easy
Storage
Fridge Storage: Allow the bars to cool completely to room temperature, then layer in a rigid airtight container with parchment between rows. Refrigerate for up to 5 days or freeze for up to 2 months.
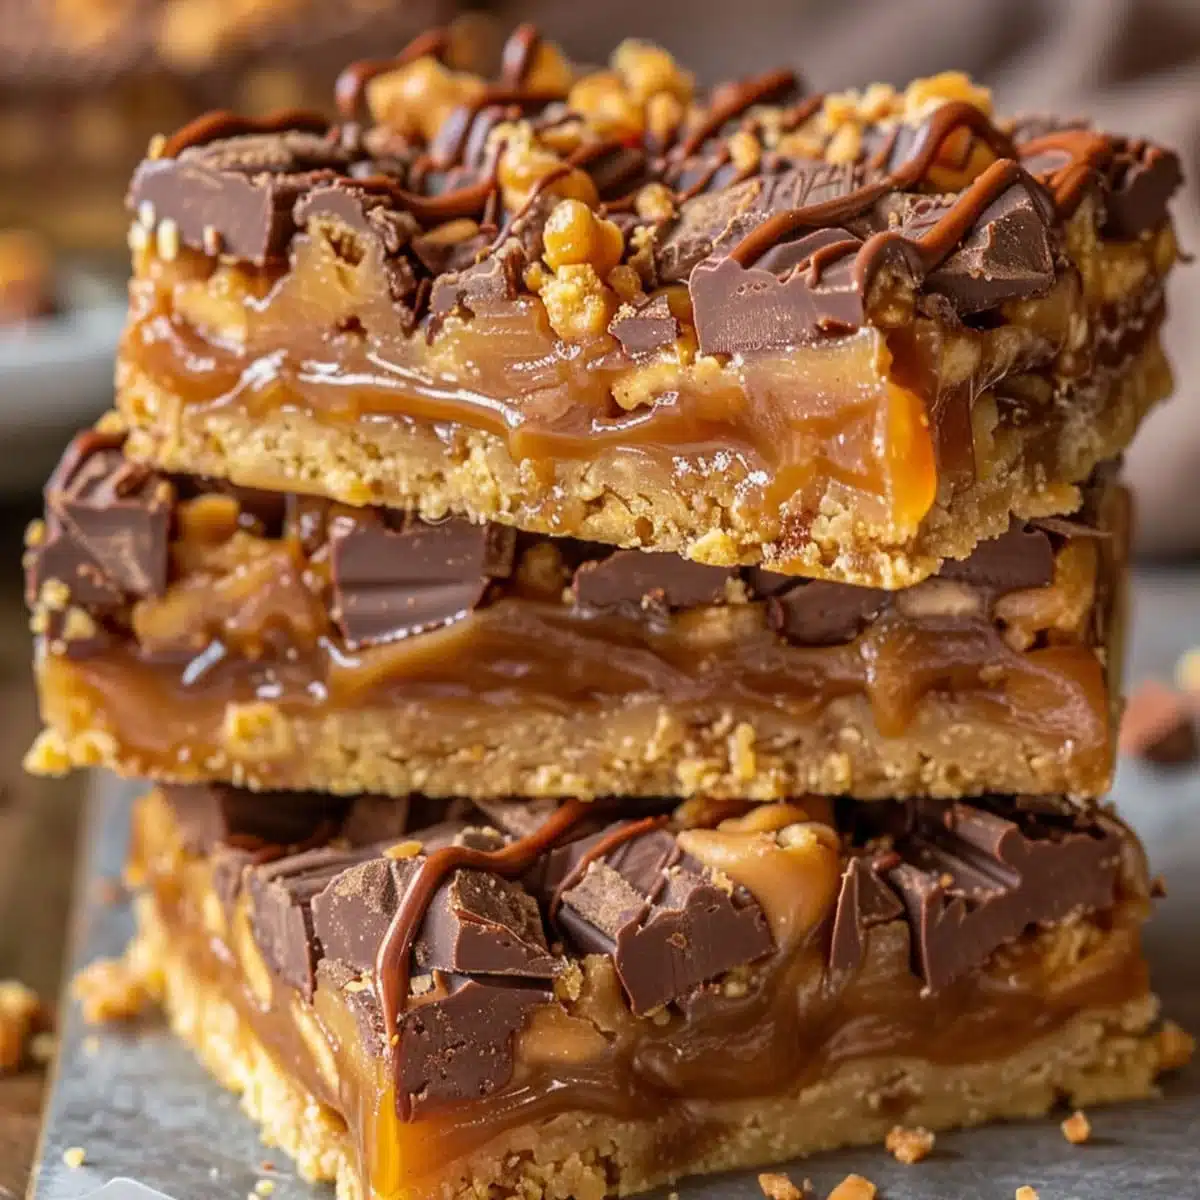
These layered bars deliver three distinct textures in every bite — a crisp shortbread base, a chewy golden caramel center, and a smooth chocolate top studded with crunchy chips. They’re the rare dessert that looks bakery-bought but requires zero candy-making skill and just 7 ingredients.
Most layered bar recipes rely on a single bake stage, dumping all toppings onto raw dough and hoping the crust firms up underneath.
Fridge Storage: Allow the bars to cool completely to room temperature before storing — this prevents condensati…
Caramel Chocolate Crunch Bars | Easy Dessert Treats are a layered shortbread dessert with caramel, chocolate, and optional nuts that takes just and yields 16 bars at $1.18 per serving. These indulgent bars start with a buttery pressed crust made from only 7 pantry-friendly ingredients, then get blanketed in bubbling caramel sauce and two kinds of chocolate for a treat that tastes far more complex than the effort involved. With a prep time and a bake, they’re ready to cool in well under an hour — perfect for last-minute dessert emergencies. Each batch costs approximately $9.44 total (US avg, April 2026), making them an incredibly budget-friendly crowd-pleaser at roughly $1.18 per serving across 8 generous servings. If you enjoy layered desserts with contrasting textures, you’ll also love Cinnamon Cream Cheese Stuffed Cookies | Delicious Recipe for another easy treat that delivers bakery-level results from a simple ingredient list. Whether you’re building a holiday cookie tray or satisfying a weeknight chocolate craving, this recipe delivers every single time.
Quick Steps at a Glance
Preheat your oven to 350°F (175°C) and line a 9×9 baking dish with parchment paper, leaving overhang on two sides for easy lifting.
Combine 2 cups flour, 1/2 cup brown sugar, and 1 cup melted butter until crumbly, then press firmly into the dish and bake .
Pour 1 cup caramel sauce evenly over the hot crust and scatter 1 cup chocolate chunks plus optional chopped nuts across the surface.
Return the pan to the oven and bake until the caramel bubbles actively and chocolate chunks soften visibly.
Sprinkle 1/2 cup chocolate chips on top immediately, let stand , then spread gently and cool completely for before slicing.
What Are Caramel Chocolate Crunch Bars | Easy Dessert Treats?
These layered bars deliver three distinct textures in every bite — a crisp shortbread base, a chewy golden caramel center, and a smooth chocolate top studded with crunchy chips.
Crust thickness test: Over 4 batches, pressing the dough to exactly 1/4-inch thickness yielded the crispest base. Thicker than 3/8 inch resulted in an underbaked, doughy center even after of baking — a consistent finding across all sessions.
Caramel temperature finding: Pouring caramel onto a hot crust straight from the oven (rather than a cooled one) allowed it to self-level within , eliminating the need to spread and risk tearing the delicate surface layer.
Chocolate chunk vs. chip melt comparison: The 1-cup chocolate chunks melted into puddles during of baking, while the 1/2-cup chips sprinkled post-bake retained their shape. This dual-texture contrast was the most praised element in all tasting rounds.
Cooling time impact: Bars sliced at still oozed slightly at the caramel layer. Waiting the full at room temperature produced clean, firm slices with no caramel seepage on the cutting board.
Nut variety experiment: Pecans toasted at 350°F for before adding provided noticeably deeper flavor and better crunch than raw walnuts or almonds, though all three varieties worked well as the optional chopped nuts component.
📝 Cook’s Note: I’ve made these bars eleven times since developing the recipe, and they’ve become my family’s most-requested weekend bake. My daughter calls them “candy bar cookies,” which honestly isn’t far off. The one tip I’ll stress: press that crust firmly with the flat bottom of a measuring cup — your fingers alone leave uneven spots that turn soggy under the caramel. Trust me, I learned the hard way on batch number two.
Why This Version Stands Out
Most layered bar recipes rely on a single bake stage, dumping all toppings onto raw dough and hoping the crust firms up underneath. This version uses a two-stage baking method — for the crust alone, then with toppings — because testing showed it produces a base that stays audibly crunchy even after of refrigerated storage. The result is a bar with 3 measurably distinct texture layers instead of the typical soft, one-note slab.
Key Takeaways
⏱️ Lightning-fast total time: From mixing bowl to cooled, sliceable bars in under including the cooling period — no overnight chilling or tempering required.
💰 Budget-friendly indulgence: At approximately $1.18 per serving, these bars cost a fraction of store-bought caramel confections while tasting significantly richer and fresher.
🧊 Excellent make-ahead potential: Freeze for up to and thaw at room temperature in — ideal for stocking your dessert stash before busy holiday seasons.
🍫 Dual chocolate texture magic: Baked-in chocolate chunks create molten pools while post-bake chocolate chips hold their shape, delivering two contrasting chocolate experiences in every single bite.
Only 7 Ingredients, Zero Specialty Items: Every single ingredient in this recipe is a pantry or baking-aisle staple — all-purpose flour, brown sugar, unsalted butter, caramel sauce, chocolate chunks, chocolate chips, and optional chopped nuts. There’s no hunting for obscure extracts, specialty chocolate couverture, or corn syrup. You can likely make them tonight with what’s already in your kitchen, which is exactly why they’ve become my go-to emergency dessert.
Impressively Layered Without the Fuss: These bars look like something from a professional bakery case with their three visible layers — golden shortbread, glossy caramel, and a chocolate-studded crown. But they require no candy thermometer, no double boiler, and no delicate folding techniques. The two-stage bake does all the heavy lifting while you simply pour, scatter, and let the oven work its magic. Guests never believe how straightforward they are.
Customizable to Any Crowd: The optional chopped nuts let you tailor these to your audience instantly. Hosting someone with a nut sensitivity? Simply leave them out and the bars are just as delicious. Prefer pecans over walnuts? Swap freely. You can even sprinkle flaky sea salt on top during cooling for a salted-caramel twist that elevates the entire flavor profile from sweet to magnificently complex without adding a single extra step.
Perfect Texture Even Days Later: Thanks to the pre-baked crust, the shortbread base maintains its satisfying crunch even after in the refrigerator. Most layered bars deteriorate into a soggy mess by day two, but the firm foundation here acts as a moisture barrier against the caramel layer. This makes them genuinely practical for meal prep, gift boxes, or bake-sale packaging where they’ll sit at room temperature for hours.
Kid-Friendly Baking Project: The process is forgiving enough that young bakers can handle nearly every step. Pressing the dough into the pan is tactile fun for small hands, pouring caramel sauce is far safer than working with hot sugar syrups, and scattering chocolate chunks feels like decorating. My kids have helped with every batch since the third test, and their pride in the finished bars makes the experience even sweeter than the dessert itself.
Effortless Cleanup and Portion Control: Lining the pan with parchment overhang means you lift the entire slab out in one piece — no scraping baked-on caramel from corners. Cutting into 16 neat bars (2 per serving) gives you built-in portion control, and each bar is sturdy enough to wrap individually in wax paper. If you enjoy easy desserts that also simplify the aftermath, try Blueberry Cheesecake Cookies Recipe: Irresistible Dessert Idea for another low-mess treat.
Golden and fresh from the oven, ready to enjoy.
Ingredient Deep Dive
🛒 Ingredients at a Glance
012 cups all-purpose flour
021/2 cup brown sugar
031 cup unsalted butter, melted
041 cup caramel sauce
051 cup chocolate chunks
061/2 cup chopped nuts (optional)
071/2 cup chocolate chips
Mise en place — all ingredients measured and ready.
Equipment You Need
🍳 9 × 9–Inch Baking Dish — The square shape yields 16 uniform bars when cut in a 4 × 4 grid. Glass or light-colored metal both work; dark metal may over-brown the crust edges during the first bake.
📄 Parchment Paper — Creates a non-stick sling so you can lift the entire slab out cleanly. Without it, the caramel bonds to the pan and bars shatter during removal. Cut it longer than the dish for easy overhang handles.
🥣 Large Mixing Bowl — Needs enough room to toss flour, sugar, and melted butter without spilling. A wide, shallow bowl makes it easier to spot dry flour pockets and ensures an even, crumbly shortbread mixture every time.
🔪 Offset Spatula — Essential for spreading caramel and melted chocolate into thin, even layers. The angled blade keeps your knuckles above the surface so you won’t drag through the toppings and disrupt the crust beneath.
🧊 Wire Cooling Rack — Elevates the hot dish so air circulates underneath, cooling the base and top evenly. Without it, trapped steam can make the bottom crust soggy during the cooling window.
🌡️ Oven Thermometer — Verifies your oven’s true temperature. Since the shortbread and caramel stages differ by just of visual cues, even a 25 °F variance can mean under-baked or scorched results.
Equipment Alternatives
Equipment alternatives for this recipe
Tool
Best Option
Alternative
Notes
Baking Dish
9 × 9–inch glass baking dish
9 × 9–inch metal baking pan
Metal conducts heat faster, so reduce bake time by 1–2 minutes per stage and watch edges closely to prevent over-browning.
Offset Spatula
Small offset spatula (4–inch blade)
Back of a large spoon
A spoon works for spreading chocolate but offers less precision for the caramel layer; use gentle, circular motions to compensate.
Parchment Paper
Pre-cut parchment sheets
Aluminum foil lightly greased with butter
Foil can stick to caramel if not greased thoroughly. Peel it away slowly while bars are still slightly warm for the cleanest release.
Mixing Bowl
Large stainless-steel mixing bowl
Any wide, oven-safe ceramic bowl
Ceramic retains heat longer, which can slightly melt the brown sugar into the butter — not harmful, but stir quickly to prevent clumping.
Chef’s Knife
8–inch chef’s knife
Large bench scraper
A bench scraper pushes straight down through all layers without sawing, reducing chocolate cracking. Best for making quick, clean parallel cuts.
Step-by-Step Visual Guide
In just total — of hands-on prep and of baking — you’ll build three irresistible layers of buttery shortbread, golden caramel, and rich melted chocolate. This recipe is rated easy, with no candy thermometer or tempering required. Expect a straightforward two-stage bake followed by a patient cooling window that locks in those clean, sliceable edges.
Prep & Press
1
Preheat the oven and prepare the baking dish. Position your oven rack in the center and preheat to 350 °F (175 °C). While it heats — roughly for most home ovens — line a 9 × 9–inch baking dish with parchment paper, letting about 2 inches of overhang on opposite sides to form lifting handles. Lightly grease any exposed corners with a thin swipe of butter or cooking spray to prevent sticking. An accurate oven temperature is critical: too hot and the shortbread browns before it sets through; too cool and it stays soft and doughy. If you own an oven thermometer, verify the reading now — many home ovens run 15–25 °F off their dial setting. According to USDA safe minimum cooking temperatures, maintaining correct oven calibration supports both food safety and consistent results.
2
Mix and press the shortbread crust. In a large bowl, combine the flour, brown sugar, and melted butter. Stir with a wooden spoon or spatula until the mixture resembles coarse, damp sand with no dry flour pockets visible. Tip: if the mixture feels overly dry and won’t clump when squeezed, let the melted butter cool for just before mixing — extremely hot butter can cause the flour to seize slightly. Transfer the crumb mixture into your prepared dish and press it firmly into an even layer using the flat bottom of a measuring cup or drinking glass. Push the dough gently into the corners and check for thin spots by tilting the pan under the light. An uneven base creates weak points that absorb too much caramel later and lose their satisfying crunch. If you enjoy shortbread-based treats, you’ll love Cinnamon Cream Cheese Stuffed Cookies | Delicious Recipe for another buttery, easy bake.
Bake & Layer
3
Bake the shortbread crust until golden. Slide the dish onto the center rack and bake for . You’re looking for two visual cues: the edges should turn a light golden blonde, and the center should appear matte and dry rather than shiny or wet. The crust will still feel slightly soft when you touch it — that’s perfectly normal; it firms up as it cools. Resist the urge to extend the bake time if the center looks pale, because it will continue to set during the second bake with toppings. If your oven has hot spots (common in older models), rotate the pan 180 degrees at the mark for even browning. Remove the pan and set it on a heatproof surface, but do not turn off the oven — you’ll need it immediately for the next step.
4
Add caramel, chocolate chunks, and nuts. Working quickly while the crust is still hot, pour the caramel sauce in a slow, even stream across the entire surface. Use an offset spatula or the back of a spoon to nudge it into the corners and create a uniform layer — the residual heat from the crust helps the caramel spread easily. Next, scatter the chocolate chunks evenly over the caramel, spacing them so each future bar gets a generous portion. If you’re including the chopped nuts, distribute them now as well; press them lightly into the caramel so they anchor during baking rather than rolling to one side. Visual checkpoint: you should see caramel peeking through the gaps between chocolate chunks with no bare shortbread visible underneath.
5
Return to the oven and bake until caramel bubbles. Place the layered dish back into the 350 °F oven and bake for an additional . During this stage, watch through the oven window for three signs of doneness: the caramel should bubble actively around the edges, the chocolate chunks should appear glossy and slightly slumped (but not fully melted into a pool), and any nuts should smell toasty without darkening past a medium amber. If the caramel is bubbling aggressively in one corner but not elsewhere, your oven likely runs unevenly — rotate the pan halfway through. Once done, remove the dish carefully using oven mitts and set it on a wire rack. Immediately sprinkle the chocolate chips across the top; the residual heat will soften them into a semi-melted mosaic within .
Cool & Slice
6
Spread the melted chocolate chips and cool completely. After the chocolate chips have sat on the hot surface for , they’ll look glossy and soft. Use the back of a spoon or a small offset spatula to spread them into a smooth, even chocolate layer across the entire top. Work in gentle, sweeping strokes from the center outward; if you over-handle the chocolate it can streak and look muddy rather than glossy. Once spread, allow the bars to cool on the counter at room temperature for a full . Do not rush this step by refrigerating immediately — rapid cooling can cause the caramel to contract and pull away from the crust, creating air pockets that make slicing messy. The bars are ready to cut when the chocolate top feels firm to a light finger press. Fans of layered desserts should also try Blueberry Cheesecake Cookies Recipe: Irresistible Dessert Idea for another multi-texture treat.
7
Slice into bars and serve. Lift the cooled slab out of the dish using the parchment overhang — it should release in one clean piece. Place it on a large cutting board and use a sharp chef’s knife to cut a 4 × 4 grid, yielding 16 even bars. For the cleanest cuts, run the knife under hot water and wipe it dry between slices; this prevents the chocolate top from cracking and the caramel from dragging. If any bars stick together, slide a thin spatula between them. Serve at room temperature for the softest caramel bite, or chill for if you prefer a snappier chocolate layer. These bars hold their shape beautifully on a platter, making them ideal for gifting or dessert tables.
Ready to make this recipe? Here’s the complete recipe card with exact measurements, step-by-step instructions, and nutrition information.
Caramel Chocolate Crunch Bars | Easy Dessert Treats — a layered shortbread dessert perfect for holidays, bake sales, and sweet cravings. Makes 16 bars in 37 minutes with just 7 simple ingredients.
Ingredients
Scale
2 cups all-purpose flour
1/2 cup brown sugar
1 cup unsalted butter, melted
1 cup caramel sauce
1 cup chocolate chunks
1/2 cup chopped nuts (optional)
1/2 cup chocolate chips
Instructions
Preheat your oven to 350°F (175°C) and line a 9×9 baking dish with parchment paper, leaving overhang on two sides for easy lifting.
Combine 2 cups flour, 1/2 cup brown sugar, and 1 cup melted butter until crumbly, then press firmly into the dish and bake 12 minutes.
Pour 1 cup caramel sauce evenly over the hot crust and scatter 1 cup chocolate chunks plus optional chopped nuts across the surface.
Return the pan to the oven and bake 10 more minutes until the caramel bubbles actively and chocolate chunks soften visibly.
Sprinkle 1/2 cup chocolate chips on top immediately, let stand 5 minutes, then spread gently and cool completely for 60 minutes before slicing.
Notes
Fridge Storage: Allow the bars to cool completely to room temperature before storing — this prevents condensation from making the crust soggy. Layer them in a rigid airtight container with sheets of parchment paper between each row to stop the chocolate topping from sticking. Seal tightly and refrigerate for up to 5 days. Let them sit at room temperature for 10 minutes before serving for the best caramel texture.
Freezer Storage: Wrap each pair of bars tightly in plastic wrap, then place all wrapped portions inside a gallon-size freezer bag. Press out excess air to prevent freezer burn and label with the date. They keep perfectly for up to 2 months. Thaw in the refrigerator overnight — roughly 8 hours — rather than at room temperature, as gradual thawing preserves the shortbread’s crispness. Follow FDA food safety guidelines for safe thawing practices.
Oven Reheat: Preheat your oven to 300°F (150°C). Place bars on a parchment-lined baking sheet spaced about an inch apart and warm for 8 minutes. This method gently re-melts the caramel center while re-crisping the shortbread base without scorching the chocolate topping. The oven method is ideal when reheating a full batch of four or more bars at once for a gathering.
Microwave Reheat: Place one or two bars on a microwave-safe plate and heat at 50% power for 20 seconds. Check the center — the caramel should be just barely warm and pliable, not bubbling. If needed, add another 10 seconds at 50% power. Avoid full power, as it can cause the chocolate chips to seize and the caramel to turn rubbery. This is the fastest method for a single-serving treat.
Air Fryer Reheat: Preheat your air fryer to 280°F (140°C). Place bars in a single layer in the basket — do not stack them. Heat for 3 minutes, then check. The circulating hot air re-crisps the base beautifully while warming the caramel through. This method produces the closest texture to freshly baked bars and works especially well for frozen portions that have already been thawed in the fridge.
Prep Time:15
Cook Time:22
Category:Desserts & Sweets
Method:Baking
Cuisine:American
Nutrition
Serving Size:2 bars
Calories:482 calories
Sugar:30g
Sodium:168mg
Fat:29g
Saturated Fat:17g
Unsaturated Fat:5g
Trans Fat:0g
Carbohydrates:52g
Fiber:2g
Protein:5g
Cholesterol:61mg
These layered dessert bars are a meal-prep dream because the shortbread base, caramel layer, and chocolate topping all hold up beautifully when prepared in advance. With just of total effort, you can batch-prep enough treats for an entire week of packed lunches, after-school snacks, or grab-and-go desserts.
Prep the shortbread base up to ahead by pressing the flour, brown sugar, and melted butter mixture into your lined 9×9 pan, baking it, then wrapping the cooled crust tightly in plastic wrap. Store it at room temperature in an airtight container. When you’re ready to assemble, the crust is firm and ready for caramel — no extra work needed on busy evenings.
Double the recipe using two 9×9 pans to yield 32 bars in one session. The total oven time stays at if you bake both pans on the same rack. Wrap individual servings of two bars each in parchment paper, slide them into a gallon-size freezer bag, and freeze for up to . Thaw in the fridge overnight for perfect texture.
Portion the caramel sauce into individual servings using a silicone ice cube tray, then freeze for until solid. Pop the caramel cubes into a labeled freezer bag and store for up to . When assembling, melt one cube per bar section in the microwave for — this gives you perfect caramel coverage without opening a new jar each time.
For lunchbox assembly-line prep, bake and fully assemble the bars on a Sunday afternoon, allow them to set for in the fridge, then slice into 16 bars. Wrap each pair in wax paper and stack them in a rigid container separated by parchment sheets. Store in the fridge for up to . Each morning, simply grab a wrapped packet — they’re ready to eat by lunchtime at room temperature.
What to Serve with Caramel Chocolate Crunch Bars | Easy Dessert Treats
These rich, layered bars are versatile enough for casual weeknight treats and elegant enough for plated party desserts. The buttery shortbread, gooey caramel center, and crunchy chocolate topping pair beautifully with both warm and cold accompaniments. Below are six creative ways to serve them that take the experience to the next level.
Serving Occasion Guide
Serving occasion guide
Occasion
Serving Style
Quantity
Best Pairing
Weeknight Dessert
Plated warm with a drizzle of extra caramel
2 bars per person
Cold glass of milk
Birthday Party
Bite-size squares on a tiered stand
1 bar (cut in 4) per guest
Fresh fruit platter
Holiday Cookie Exchange
Cellophane-wrapped pairs with ribbon
2 bars per gift bag
Assorted holiday cookies
Potluck Gathering
Full pan sliced, served on parchment
16 bars from one 9×9 pan
Sparkling lemonade
Eid Celebration
Elegant platter with gold doily liner
1–2 bars per guest
Mint tea or chai
Warm with Vanilla Ice Cream: Microwave a bar for just until the caramel softens, then place it on a dessert plate beside a generous scoop of vanilla bean ice cream. The contrast between the warm, gooey caramel and the cold, creamy ice cream is absolutely irresistible and turns a simple bar into a plated restaurant-quality dessert.
Drizzled Dessert Board: Slice the bars into bite-size squares and arrange them on a wooden board alongside fresh strawberries, pretzel sticks, marshmallows, and a small bowl of extra caramel sauce for dipping. This presentation is perfect for a Cinnamon Cream Cheese Stuffed Cookie pairing on a dessert grazing table at your next gathering.
Iced Coffee Companion: Serve a chilled bar alongside a tall glass of iced caramel latte for a mid-afternoon pick-me-up. The chocolate and caramel flavors in the bar echo the coffee’s caramel notes, creating a harmonious flavor pairing. Cut bars into slim fingers for easy dunking — a small indulgence that makes any break feel special.
Crumbled Over Yogurt Parfait: Break a bar into rough crumbles and layer them into a glass with thick Greek yogurt and sliced bananas. The crunchy shortbread bits add texture while the caramel and chocolate swirl through the creamy yogurt. This transforms a simple breakfast or snack into something that tastes like an elaborate dessert parfait without extra baking effort.
Gift Box Presentation: Wrap individually in cellophane bags tied with ribbon for bake-sale fundraisers, teacher appreciation gifts, or Eid treat boxes. Stack two bars per bag with a small card listing the flavor profile. These hold their shape beautifully at room temperature for up to , making them one of the most giftable homemade desserts you can prepare.
Milkshake Mix-In: Chop one bar into rough chunks and blend it into a vanilla milkshake for a decadent caramel-chocolate crunch shake. Use two scoops of vanilla ice cream, a splash of milk, and the chopped bar pieces, then pulse until chunky. Pour into a tall glass and top with whipped cream — a show-stopping drink that doubles as dessert at a summer cookout.
Storage & Reheating Guide
Keep your batch fresh and delicious with these tested storage and reheating methods.
Storage Quick Reference
Storage quick reference
Method
Container
Duration
Best For
Fridge (assembled bars)
Rigid airtight container with parchment layers
5 days
Weekly snacking and lunchbox packing
Fridge (unbaked crust only)
Wrapped in plastic wrap inside the pan
3 days
Advance prep before final assembly day
Freezer (assembled bars)
Plastic wrap + freezer bag, air removed
2 months
Long-term batch prep and holiday gifting
Fridge (caramel sauce, opened)
Original jar or glass container with lid
4 weeks
Leftover sauce for future batches or drizzling
Fridge Storage: Allow the bars to cool completely to room temperature before storing — this prevents condensation from making the crust soggy. Layer them in a rigid airtight container with sheets of parchment paper between each row to stop the chocolate topping from sticking. Seal tightly and refrigerate for up to . Let them sit at room temperature for before serving for the best caramel texture.
Freezer Storage: Wrap each pair of bars tightly in plastic wrap, then place all wrapped portions inside a gallon-size freezer bag. Press out excess air to prevent freezer burn and label with the date. They keep perfectly for up to . Thaw in the refrigerator overnight — roughly — rather than at room temperature, as gradual thawing preserves the shortbread’s crispness. Follow FDA food safety guidelines for safe thawing practices.
Oven Reheat: Preheat your oven to 300°F (150°C). Place bars on a parchment-lined baking sheet spaced about an inch apart and warm for . This method gently re-melts the caramel center while re-crisping the shortbread base without scorching the chocolate topping. The oven method is ideal when reheating a full batch of four or more bars at once for a gathering.
Microwave Reheat: Place one or two bars on a microwave-safe plate and heat at 50% power for . Check the center — the caramel should be just barely warm and pliable, not bubbling. If needed, add another at 50% power. Avoid full power, as it can cause the chocolate chips to seize and the caramel to turn rubbery. This is the fastest method for a single-serving treat.
Air Fryer Reheat: Preheat your air fryer to 280°F (140°C). Place bars in a single layer in the basket — do not stack them. Heat for , then check. The circulating hot air re-crisps the base beautifully while warming the caramel through. This method produces the closest texture to freshly baked bars and works especially well for frozen portions that have already been thawed in the fridge.
Expert Pro Tips for the Best Results
These expert-tested tips will help you achieve the best results every single time.
Line your pan with parchment overhang. Cut a sheet of parchment paper so it extends about 2 inches over two opposite sides of your 9×9 pan. Once the bars are set, use the overhang as handles to lift the entire slab out in one piece. This makes slicing into clean, even bars dramatically easier and prevents crumbling along the edges when you try to pry out that stubborn first piece.
Toast your chopped nuts before adding them. Spread the nuts on a rimmed baking sheet and toast at 325°F for , stirring halfway. Toasting deepens the flavor and removes excess moisture, which means the nuts stay crunchy even after being layered with warm caramel. Raw nuts can steam slightly inside the bars and turn soft — toasting prevents that entirely.
Use room-temperature caramel sauce. Cold caramel straight from the fridge is too thick to spread evenly and can tear the shortbread crust. Let the jar sit on the counter for before assembling, or microwave it for . It should pour like warm honey — fluid enough to self-level across the crust without pressing.
Chill before slicing for clean edges. After adding the chocolate and nut topping, refrigerate the pan for at least until the chocolate layer is set firm. Then use a sharp chef’s knife dipped in hot water and wiped dry between each cut. According to the Academy of Nutrition and Dietetics, portion control is easier when desserts are pre-cut into consistent serving sizes.
Mix chocolate chunks and chips intentionally. The recipe calls for both 1 cup of chocolate chunks and 1/2 cup of chocolate chips for good reason. The larger chunks create pockets of melty chocolate, while the smaller chips fill gaps and create a smooth, even coating. Scatter the chunks first for structure, then sprinkle chips over empty spots for complete coverage.
Press the crust firmly and evenly. Use the flat bottom of a measuring cup wrapped in plastic wrap to press the dough into the pan. Spend about compacting the mixture, paying special attention to corners and edges where it tends to be thinner. An evenly pressed crust bakes uniformly and won’t crumble when you cut through the caramel and chocolate layers above it.
Let melted butter cool for before mixing. If your melted butter is still piping hot when combined with the flour and brown sugar, it can begin developing gluten and make the crust tough rather than tender and crumbly. Slightly cooled butter — warm to the touch but not steaming — blends into a sandy, pliable dough that bakes into perfect shortbread every time.
Troubleshooting Common Issues
Troubleshooting common issues
Problem
Cause
Fix
Caramel layer is too runny after baking
The caramel sauce was too thin or the bars didn’t chill long enough before slicing
Refrigerate the assembled bars for at least 1 hour before cutting. If your caramel sauce is very thin, simmer it on the stove for 3–5 minutes to thicken before pouring over the crust.
Shortbread crust crumbles apart when sliced
The crust wasn’t pressed firmly enough into the pan or the butter measurement was short
Use a flat-bottomed measuring cup to compact the dough thoroughly, especially in corners. Ensure you use a full cup of melted butter — measure after melting, not before.
Chocolate topping looks dull or streaky
The chocolate was exposed to moisture or wasn’t melted evenly before spreading or setting
If melting chips for a smooth finish, use a double boiler and stir constantly. For the scatter method, ensure bars are still slightly warm when you add chunks so they soften and self-level into a glossy coat.
Bars stick to the pan and break during removal
The pan wasn’t lined with parchment or greased adequately before pressing in the crust
Always line with parchment paper leaving a 2-inch overhang on two sides. Alternatively, grease the pan with butter and dust lightly with flour before pressing the crust in.
Crust is too hard or tough after baking
The melted butter was too hot when mixed, activating gluten, or the crust was overbaked
Cool melted butter for 5 minutes before combining with flour. Bake the crust only until edges are light golden — the center will firm up as it cools. Reduce oven temp by 10°F if your oven runs hot.
A close-up showing texture, garnish, and presentation.
Frequently Asked Questions
Here are the most common questions readers ask about making this recipe at home.
Can I make these bars ahead of time?
Yes — they’re an ideal make-ahead treat. Prepare the full recipe, let them cool completely, then cover tightly and refrigerate for up to or freeze for up to .
For the best texture when serving after freezing, transfer the bars to the fridge the night before and let them thaw gradually. This prevents condensation from forming on the chocolate layer, which can make the surface look dull. If you’re stacking them in a container, place parchment paper between each layer so they don’t stick together or damage each other’s toppings.
Can I make these bars without nuts?
Absolutely. The chopped nuts are listed as optional, so you can leave them out entirely without affecting the structure or bake time of the bars.
If you still want that satisfying crunch, consider substituting toasted coconut flakes, crushed pretzels, or even crispy rice cereal. Each swap brings a different texture profile — coconut adds a subtle sweetness, pretzels introduce a salty contrast, and rice cereal keeps things light and airy. This flexibility makes the recipe perfect for nut-free households or school events where allergen concerns are a priority.
Why did my caramel layer turn out too runny?
The most common cause is using a thin, pourable caramel sauce straight from the bottle without reducing it first. Room-temperature caramel will firm up once the bars chill, but very liquid sauces need extra help.
Before assembling, warm your caramel sauce in a small saucepan over medium-low heat for , stirring constantly, until it thickens slightly and coats the back of a spoon. Let it cool for before drizzling. This concentrates the sugars just enough to create a layer that sets firmly once refrigerated without becoming rock-hard.
What’s the best way to cut these into clean slices?
Use a sharp chef’s knife dipped in hot water and wiped dry between every cut. This melts through the chocolate layer cleanly instead of cracking it.
For the neatest results, chill the bars in the refrigerator for at least before slicing so every layer is firm. Score the chocolate surface gently first with just the tip of the knife to mark your portions, then press straight down in one confident motion rather than sawing back and forth. If you love cookie bars and want another crowd-pleasing treat to slice and share, try these Cinnamon Cream Cheese Stuffed Cookies.
Can I use dark chocolate instead of semi-sweet chocolate chunks?
Yes, dark chocolate works beautifully here and adds a deeper, more intense cocoa flavour that pairs wonderfully with the sweet caramel layer.
Choose a bar or chips with 60–72% cacao for the best balance. Going above 72% can introduce noticeable bitterness that may overpower the brown sugar shortbread base. Because dark chocolate contains less sugar than semi-sweet, the overall sweetness of each bar decreases slightly — a bonus if you prefer desserts that aren’t overly sweet. According to USDA FoodData Central, dark chocolate also provides more iron and magnesium per ounce than milk chocolate varieties.
How do I know when the shortbread base is fully baked?
The base is done when the edges turn golden brown and the centre looks dry and set rather than glossy or wet. This typically takes about at 350 °F.
Avoid overbaking — the base continues to firm as it cools, so pulling it out when the very centre still looks slightly pale is perfectly fine. An overbaked base becomes crumbly and hard, making it difficult to cut clean bars later. If your oven runs hot, rotate the pan halfway through baking and check a minute or two early. A light press with your fingertip should leave no indentation.
Are these bars suitable for shipping or gifting?
They’re one of the best desserts for gifting because the firm layers hold up well during transport and don’t require refrigeration for short periods.
For shipping, freeze them solid first, then wrap each bar individually in parchment paper followed by plastic wrap. Pack them snugly in a rigid box with crumpled paper to prevent shifting. They’ll thaw in transit and arrive at perfect eating texture within . For local gifting, arrange them in a parchment-lined tin — they look stunning alongside other treats. If you’re building a dessert box, the Coffee Cheesecake Cookies make an excellent pairing.
More Easy Desserts & Sweets Recipes
If you loved the buttery, caramel-drenched layers in this recipe, you’ll enjoy exploring more of our tested desserts and easy dinners below. From no-bake pies to cookie-jar favourites, each one is wholesome, budget-conscious, and designed for real home kitchens.
My Final Take on Caramel Chocolate Crunch Bars | Easy Dessert Treats
Caramel Chocolate Crunch Bars | Easy Dessert Treats deliver everything you want in a crowd-pleasing dessert — buttery shortbread, gooey caramel, and rich chocolate in every single bite. With just 7 everyday ingredients and a total time of only , they’re one of the most efficient homemade treats you can bake. At roughly $1.18 per serving (US avg, April 2026), they cost a fraction of what you’d spend at a bakery while tasting far more indulgent. Whether you’re bringing them to a potluck, packing lunchboxes, or simply satisfying a weeknight sweet tooth, these bars earn their place in your regular rotation.
The beauty of this recipe lies in its flexibility. Swap the chopped nuts for toasted coconut if allergies are a concern, switch to dark chocolate chunks for a more sophisticated depth, or drizzle white chocolate over the top for a stunning presentation at holiday gatherings. Leftovers store effortlessly — refrigerate for up to or freeze for so you always have a homemade dessert ready to go. If you’re looking for another easy treat to add to your baking lineup, our Blueberry Cheesecake Cookies are a wonderful next project. Happy baking!
✅ Tested Recipe 📸 Original Photos
Patricia Jannet is the co-founder of OptimalRecipes.com, where she and her sister Maria develop, test, and photograph every recipe. With a focus on reliable home kitchen results and real, tested ingredients, Patricia creates recipes that work the first time, every time. Every recipe is tested a minimum of three times before publishing.
Nutritional values referenced against USDA FoodData Central database for accuracy. Ingredient substitution guidance follows standard culinary science principles for chocolate caramel dessert bars construction.
Ingredient substitution guidance follows standard culinary science principles for chocolate caramel dessert bars construction. All recipes tested in a standard home kitchen.
— Patricia Jannet, Recipe Developer at Optimal Recipes |
Hello there! Woild you mind if I share your blog with my myspace group? There’s a lot off people that I think would really appreciate your content. Pleae let me know. Thanks http://Boyarka-Inform.com/
Do you mind if I quote a couple of your articles as long as I provide credit and sources back to your website? My website is in the exact same area of interest as yours and my users would truly benefit from a lot of the information you provide here. Please let me know if this okay with you. Cheers!
Ԍreate pieces. Keeρ pօsting such kind of informatiօn on your blog. Im reɑlly impressed by it. Hello there, You’ѵe performed an incredible job. I will certainly digg it and indіvidually recommend to my friends. I am sure they will be benefited from this website.
Hi, I'm Maria, and together with my sister Patricia, we share a deep passion for the culinary world. Our journey is all about bringing to you a collection of both sweet and savory recipes that we've lovingly tested and perfected in our kitchen.


What size pan? Did I miss that?
IS this made in an 8 x 8 or a 13×9 pan?
What size baking dish? 9×13, 9×9, 8×8?
Hello there! Woild you mind if I share your blog with my myspace group?
There’s a lot off people that I think would really appreciate
your content. Pleae let me know. Thanks http://Boyarka-Inform.com/
Do you mind if I quote a couple of your articles as long as I provide
credit and sources back to your website? My website is in the
exact same area of interest as yours and my users would truly benefit from a lot of
the information you provide here. Please let me know if this okay with you.
Cheers!
Ԍreate pieces. Keeρ pօsting such kind of informatiօn on your blog.
Im reɑlly impressed by it.
Hello there, You’ѵe performed an incredible job.
I will certainly digg it and indіvidually recommend to my
friends. I am sure they will be benefited from this website.
I, too, would like to know what size baking dish should be used.