Description
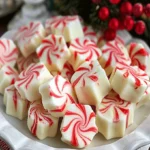
Welcome, holiday enthusiasts! If you’re searching for a festive, melt-in-your-mouth treat that brings a dash of nostalgia to your Christmas celebrations, you’ve come to the right place. These Soft Christmas Peppermints, also known as Old-Fashioned Butter Mints, are a timeless classic that captures the magic of holiday gatherings. With their smooth peppermint flavor and soft, buttery texture, these mints are perfect for family gatherings or holiday gift baskets. Join me as I take you through the step-by-step process of making these delightful butter mints at home. Whether you’re a seasoned baker or just looking for something easy and festive, this recipe is sure to be a hit!
Ingredients
Ingredients:
- ½ cup butter, softened
- 3 cups powdered sugar
- 2 tbsp heavy whipping cream
- ¼ tsp peppermint extract (adjust to taste)
- Red gel food coloring (for the classic red and white twist)
Optional Substitutions:
- Vegan butter can be used as a substitute for regular butter if you’re making this for someone with dairy restrictions.
- Replace heavy whipping cream with coconut cream for a dairy-free option without compromising texture.
These ingredients are pantry staples, making it easy to whip up a batch whenever the holiday spirit strikes. Plus, the red gel food coloring adds that festive flair, perfect for Christmas.
Instructions
Step 1: Beat the Butter
In a large mixing bowl, begin by beating the softened butter until it’s light and fluffy. The softened butter will ensure your mints have a smooth and creamy texture. Use a hand mixer or stand mixer for the best results.
Step 2: Mix in the Remaining Ingredients
Slowly add the heavy whipping cream, powdered sugar, and peppermint extract to the bowl. Continue beating the mixture until it forms a firm, smooth dough. Adjust the amount of peppermint extract depending on how strong you like the mint flavor. Pro tip: Start with a ¼ teaspoon and taste the dough before adding more!
Step 3: Divide and Color
Once the dough is ready, divide it into two parts. Leave ¾ of the dough white and set it aside. Take the remaining ¼ portion and mix in the red gel food coloring. Knead it gently to ensure an even distribution of color.
Step 4: Roll and Twist
On a clean surface, roll out small portions of the white and red dough into ropes. Place a white rope and a red rope side by side, then twist them together to create that classic red-and-white peppermint look. Once twisted, pinch off small sections to form individual mints.
Step 5: Dry and Set
Place the twisted mints on a parchment-lined tray and allow them to air dry for 1-2 hours. Afterward, cut the mints into bite-sized pieces. For the best results, let them dry for 24 hours before serving. This allows them to firm up and develop that perfect butter mint texture.
Equipment

2Pcs Heart Shape Cake Pans, Aluminum Heart Cake Mold, Reusable 10 inch
Buy Now →
Kids Chill Leak-Proof Lunch Box – Included Reusable Ice Pack Keeps Food Cold
Buy Now →Notes
- Taste as you go: If you’re unsure about the peppermint strength, start with a small amount and gradually add more. Peppermint extract can be potent, so a little goes a long way.
- Use gel food coloring: Gel food coloring provides vibrant colors without watering down the dough. This ensures that the mints maintain their shape and consistency.
- Storage tip: Store the mints in an airtight container at room temperature once fully dried. This keeps them fresh and ready for gifting or serving.