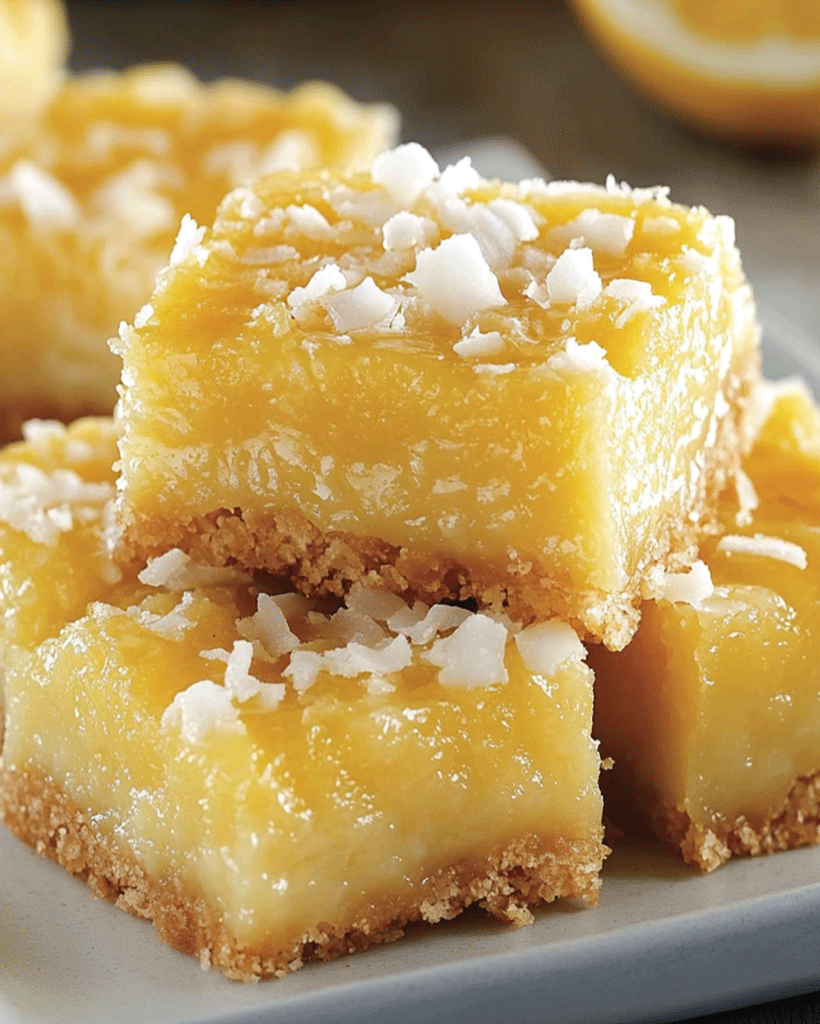
Welcome, dear readers! If you’re a fan of all things lemony and love the tropical essence of coconut, these Lemon Coconut Dream Bars will be your new favorite treat. The zesty brightness of fresh lemon paired with a creamy coconut layer creates a dessert that’s irresistible for anyone who loves refreshing, tangy-sweet flavors. Today, I’ll guide you through creating these delightful bars that offer the perfect balance of tartness and sweetness. Whether you’re a lemon lover, a coconut enthusiast, or both, these bars will make your taste buds dance!
Introduction
Imagine biting into a treat where zesty lemon mingles with shredded coconut, creating a taste of the tropics in each bite. Lemon Coconut Dream Bars are an easy-to-make yet luxurious dessert that has roots in classic lemon bars but takes it to another level with the addition of coconut. This recipe combines the smooth, creamy texture of lemon custard with the delicate crunch of shredded coconut, making it the perfect dessert for any occasion. If you’re in the mood for a fresh, tangy, and comforting dessert, these bars are your answer!
Ingredients for Lemon Coconut Dream Bars
To make these Lemon Coconut Dream Bars, gather the following ingredients for a decadent treat that’s packed with bright flavors and a rich, buttery base.
- 1 1/2 cups graham cracker crumbs – provides a sturdy, slightly sweet crust.
- 1/2 cup unsalted butter, melted – adds richness and holds the crust together.
- 1 cup granulated sugar – balances the tartness of the lemon.
- 1/4 cup all-purpose flour – helps the lemon layer set.
- 4 large eggs – brings creaminess and structure.
- 1 cup freshly squeezed lemon juice – gives a burst of natural lemon flavor.
- Zest of 1 lemon – adds depth to the lemon flavor.
- 1/2 cup shredded coconut, plus extra for garnish – adds texture and a tropical note.
Optional Substitutions: For a gluten-free option, swap the graham crackers and flour with gluten-free alternatives. You can also substitute the granulated sugar with a sugar alternative like erythritol for a lower sugar option.
How to Make Lemon Coconut Dream Bars – Step by Step
Follow this simple step-by-step guide to create perfect Lemon Coconut Dream Bars that will wow your family and friends. This Lemon Coconut Dream Bars recipe is easy to follow, and you’ll love the results.
Step 1: Prepare the Crust
- Preheat your oven to 350°F (175°C).
- Grease a 9×9-inch baking pan and line it with parchment paper to make removal easier.
- In a medium bowl, mix the graham cracker crumbs with the melted butter until well combined.
- Press this mixture firmly into the bottom of the prepared baking pan to form a solid crust.
2: Make the Lemon Filling
- In a large bowl, whisk together the sugar and flour to eliminate any lumps.
- Add the eggs one at a time, whisking thoroughly after each addition until the mixture is smooth and well-combined.
- Pour in the lemon juice and lemon zest, stirring until fully incorporated.
3: Assemble the Bars
- Pour the lemon mixture over the prepared crust, spreading it evenly.
- Sprinkle the shredded coconut on top for a lightly toasted finish.
4: Bake and Cool
- Bake for 25-30 minutes or until the center is set and the edges are golden.
- Let the bars cool completely before slicing to ensure clean edges and a firm texture.
- Once cool, cut into squares, garnish with extra shredded coconut if desired, and serve!
Helpful Tips for Lemon Coconut Dream Bars
To make your Lemon Coconut Dream Bars even more delightful, here are a few tips:
- Use fresh lemon juice and zest for the best flavor. Bottled lemon juice doesn’t provide the same zing and freshness.
- Chill before slicing: After cooling, refrigerate the bars for about 30 minutes for cleaner cuts.
- Toast the coconut garnish lightly before sprinkling on top if you love a crunchy texture and a roasted coconut flavor.
Cooking Tips for the Best Lemon Coconut Dream Bars
Achieve the perfect balance of texture and flavor with these Lemon Coconut Dream Bars cooking techniques:
- Mix the crust thoroughly to ensure it holds well during baking.
- Check the edges while baking: The edges should be golden, while the center remains slightly jiggly to prevent overcooking.
- Use a hand mixer for the filling for an extra smooth, creamy lemon layer.
Serving Suggestions
These Lemon Coconut Dream Bars are versatile and make an ideal treat for gatherings, tea parties, or casual snacking. Serve them:
- With a dollop of whipped cream or a scoop of vanilla ice cream for a decadent touch.
- Paired with a hot cup of tea or coffee to complement the zesty flavors.
- On a platter with fresh fruit like raspberries or blueberries for a pop of color.
Nutritional Information
These Lemon Coconut Dream Bars are not only delicious but offer a refreshing, citrusy option for dessert lovers. Here’s a look at the nutritional benefits and content of each serving.
Nutritional Information (per serving)
Calories: 250
Fat: 12g
Saturated Fat: 8g
Carbohydrates: 32g
Fiber: 1g
Sugars: 20g
Protein: 3g
Vitamin C: 15% DV
Storage and Leftovers
For the best results, store your Lemon Coconut Dream Bars as follows:
- Refrigerate: Store in an airtight container in the refrigerator for up to 5 days.
- Freezing Option: Wrap individual bars in plastic wrap and place in a freezer-safe container for up to 3 months. Thaw in the fridge before serving.
- Reheating Tip: These bars are best served cold or at room temperature, so no reheating is necessary. Simply take them out of the fridge and enjoy!
Frequently Asked Questions (FAQs)
1. Can I make Lemon Coconut Dream Bars gluten-free?
Yes! Use gluten-free graham cracker crumbs and substitute the all-purpose flour with gluten-free flour.
2. Can I reduce the sugar in this recipe?
Yes, you can replace the sugar with a sugar substitute like erythritol or stevia. Be sure to adjust the amount according to the sweetness level.
3. How do I know when the bars are done baking?
The bars are ready when the edges are golden brown and the center is set. A slight jiggle in the center is fine as they’ll firm up while cooling.
4. Can I add extra coconut?
Absolutely! You can add more coconut to the filling for a stronger flavor or sprinkle extra on top before serving.
Related Recipes for Lemon Coconut Dream Bar Lovers
Looking for more lemon or coconut delights? Try these recipes from our collection:
Apple Fritter Bites Recipe: Easy, Delicious & Quick Treat
Winter Wonderland Chocolate Chip Christmas Cookies
Conclusion
Thank you for joining me on this culinary journey to create the perfect Lemon Coconut Dream Bars! This recipe is a sure way to bring a burst of sunshine to your dessert table, and I can’t wait for you to try it. Let us know how it turns out in the comments, or share your unique twists on this recipe. Happy baking, and don’t forget to enjoy each zesty, coconut-filled bite of these Lemon Coconut Dream Bars!
Print
Lemon Coconut Dream Bars – Zesty, Refreshing Treat
Description
Welcome, dear readers! If you’re a fan of all things lemony and love the tropical essence of coconut, these Lemon Coconut Dream Bars will be your new favorite treat. The zesty brightness of fresh lemon paired with a creamy coconut layer creates a dessert that’s irresistible for anyone who loves refreshing, tangy-sweet flavors. Today, I’ll guide you through creating these delightful bars that offer the perfect balance of tartness and sweetness. Whether you’re a lemon lover, a coconut enthusiast, or both, these bars will make your taste buds dance!
Ingredients
- 1 1/2 cups graham cracker crumbs – provides a sturdy, slightly sweet crust.
- 1/2 cup unsalted butter, melted – adds richness and holds the crust together.
- 1 cup granulated sugar – balances the tartness of the lemon.
- 1/4 cup all-purpose flour – helps the lemon layer set.
- 4 large eggs – brings creaminess and structure.
- 1 cup freshly squeezed lemon juice – gives a burst of natural lemon flavor.
- Zest of 1 lemon – adds depth to the lemon flavor.
- 1/2 cup shredded coconut, plus extra for garnish – adds texture and a tropical note.
Optional Substitutions: For a gluten-free option, swap the graham crackers and flour with gluten-free alternatives. You can also substitute the granulated sugar with a sugar alternative like erythritol for a lower sugar option.
Instructions
Step 1: Prepare the Crust
- Preheat your oven to 350°F (175°C).
- Grease a 9×9-inch baking pan and line it with parchment paper to make removal easier.
- In a medium bowl, mix the graham cracker crumbs with the melted butter until well combined.
- Press this mixture firmly into the bottom of the prepared baking pan to form a solid crust.
Step 2: Make the Lemon Filling
- In a large bowl, whisk together the sugar and flour to eliminate any lumps.
- Add the eggs one at a time, whisking thoroughly after each addition until the mixture is smooth and well-combined.
- Pour in the lemon juice and lemon zest, stirring until fully incorporated.
Step 3: Assemble the Bars
- Pour the lemon mixture over the prepared crust, spreading it evenly.
- Sprinkle the shredded coconut on top for a lightly toasted finish.
Step 4: Bake and Cool
- Bake for 25-30 minutes or until the center is set and the edges are golden.
- Let the bars cool completely before slicing to ensure clean edges and a firm texture.
- Once cool, cut into squares, garnish with extra shredded coconut if desired, and serve!
Equipment

2Pcs Heart Shape Cake Pans, Aluminum Heart Cake Mold, Reusable 10 inch
Buy Now →
Kids Chill Leak-Proof Lunch Box – Included Reusable Ice Pack Keeps Food Cold
Buy Now →Notes
- Use fresh lemon juice and zest for the best flavor. Bottled lemon juice doesn’t provide the same zing and freshness.
- Chill before slicing: After cooling, refrigerate the bars for about 30 minutes for cleaner cuts.
- Toast the coconut garnish lightly before sprinkling on top if you love a crunchy texture and a roasted coconut flavor.
