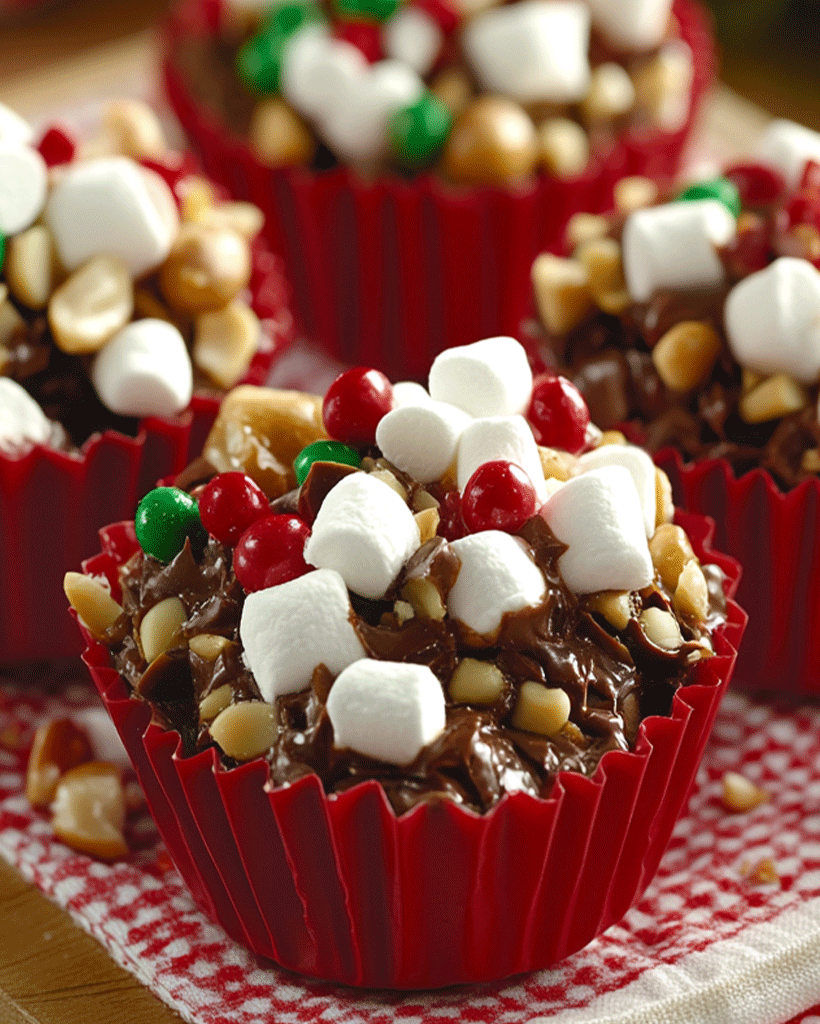
Hello and welcome! 🎉 If you’re looking for a delightful, no-bake treat perfect for the holiday season, you’ve come to the right place. These Festive Rocky Road Bites, also known as Holiday Rocky Road Candy Cups, are the ultimate crowd-pleasers! Not only are they packed with delicious chocolate, marshmallows, and nuts, but they’re also topped with vibrant holiday candies and sprinkles, making them as festive as they are tasty. Let’s get ready to make a holiday treat that will light up any gathering!
Introduction
Rocky Road is a classic treat known for its luscious blend of chocolate, marshmallows, and nuts, and these Festive Rocky Road Bites bring a holiday twist to this beloved dessert. Originating as a way to enjoy chocolate while adding texture and flavor, Rocky Road is a recipe with endless variations. These holiday-themed candy cups add seasonal joy, making them ideal for cookie exchanges, gift boxes, or holiday dessert tables. With the addition of red and green candy-coated chocolates and festive sprinkles, each bite is as cheerful as it is flavorful. Let’s dive into the ingredients and create this simple yet crowd-pleasing recipe!
Ingredients for Festive Rocky Road Bites
Gather these ingredients to prepare Holiday Rocky Road Candy Cups:
- 2 cups semi-sweet chocolate chips – For a rich chocolate base.
- 1/2 cup white chocolate chips – Adds a touch of sweetness and a beautiful contrast.
- 1/2 cup chopped peanuts – Feel free to substitute with almonds, walnuts, or pecans for a nutty crunch.
- 1/2 cup mini marshmallows – Essential for that chewy Rocky Road texture.
- 1/4 cup red and green candy-coated chocolates – Adds festive colors; you can use mini M&Ms or any candy of choice.
- 2 tablespoons holiday sprinkles – Adds a joyful touch; choose sprinkles in red, green, and white for a holiday theme.
Optional Substitutions:
- Swap semi-sweet chocolate with milk or dark chocolate, depending on your preference.
- For a nut-free version, use chopped pretzels or coconut flakes.
How to Make Festive Rocky Road Bites – Step by Step
Follow these steps for a simple, no-bake treat that will be a hit at any holiday gathering!
Step 1: Prepare the Muffin Tin
- Line a mini muffin tin with festive holiday paper liners. This will help in creating the perfect bite-sized candy cups and make them easy to serve.
2: Melt the Chocolate
- In a microwave-safe bowl, add the semi-sweet chocolate chips. Melt in 30-second increments, stirring in between, until smooth. This method prevents the chocolate from burning. Alternatively, melt the chocolate using a double boiler.
3: Mix the Ingredients
- Once the chocolate is melted and smooth, add in the chopped peanuts, mini marshmallows, and half of the white chocolate chips. Stir well to ensure all ingredients are coated in the chocolate mixture.
4: Fill the Muffin Liners
- Carefully spoon the mixture into the prepared mini muffin liners, pressing gently to fill each cup. This step is crucial to pack each bite full of holiday goodness.
5: Add the Festive Toppings
- Top each cup with a sprinkle of the remaining white chocolate chips, red and green candy-coated chocolates, and a dash of holiday sprinkles for extra festive flair.
6: Chill and Set
- Place the muffin tin in the refrigerator for 30 minutes or until the bites are set. Once ready, these treats will have a satisfying crunch with every bite.
Helpful Tips for Festive Rocky Road Bites
Creating the perfect Holiday Rocky Road Candy Cups is simple with these helpful tips:
- Use Quality Chocolate: High-quality chocolate chips make a difference in taste and texture. Opt for chocolate brands you love for the best results.
- Microwave in Intervals: Melting chocolate slowly in the microwave prevents it from scorching.
- Chill Thoroughly: Ensure your bites are firm and easy to handle by letting them set completely in the fridge.
Cooking Tips for the Best Festive Rocky Road Bites
To make your Festive Rocky Road Bites extra special, try these Rocky Road cooking techniques:
- Try a Double Boiler: If you prefer, melt the chocolate on a stovetop using a double boiler. This technique offers more control and ensures smooth, lump-free chocolate.
- Add Texture: Experiment with different textures by using crispy rice cereal or crushed cookies for added crunch.
- Holiday Flavors: Add a few drops of peppermint extract for a refreshing, festive twist.
Serving Suggestions for Festive Rocky Road Bites
Serve these Holiday Rocky Road Candy Cups as part of your holiday dessert spread. Pair them with a hot drink like peppermint cocoa or spiced eggnog to enhance the festive flavors. These bites also look stunning on a holiday-themed dessert board with other seasonal treats. Arrange them on a festive tray for a colorful and inviting presentation.
Nutritional Information
While Holiday Rocky Road Candy Cups are an indulgent treat, they are perfect for sharing and enjoying in moderation during the holiday season. Each bite offers a balance of sweetness, crunch, and festive charm.
Nutritional Information (per serving):
- Calories: Approximately 100 kcal
- Total Fat: 6g
- Saturated Fat: 3.5g
- Carbohydrates: 12g
- Sugar: 9g
- Protein: 1.5g
Storage and Leftovers for Festive Rocky Road Bites
To keep your Festive Rocky Road Bites fresh:
- Storage: Place in an airtight container and refrigerate for up to one week. Keep in a cool, dry place if serving within a day or two.
- Freezing: For longer storage, freeze the candy cups in an airtight container for up to one month. Thaw in the fridge for best texture.
Frequently Asked Questions (FAQs) for Festive Rocky Road Bites
Q1: Can I make these in advance? A1: Yes! These treats can be prepared up to a week in advance, making them perfect for holiday planning.
Q2: Can I use other nuts or no nuts at all? A2: Absolutely. You can use almonds, walnuts, or pecans. For a nut-free version, try pretzels or dried cranberries.
Q3: How do I prevent the chocolate from melting? A3: Storing these in the refrigerator keeps them firm and prevents melting, especially in warmer climates.
Q4: Are there other toppings I can add? A4: Feel free to get creative with toppings! Crushed peppermint candies or coconut flakes work great for a holiday twist.
Related Recipes for Festive Rocky Road Bites Lovers
Check out these similar treats from Optimal Recipes that you might enjoy:
Conclusion
Thank you for joining me in making these Festive Rocky Road Bites! I hope they add a little sweetness and a lot of joy to your holiday season. If you give this recipe a try, let me know how it turned out in the comments below. Share your own unique twist or a family favorite addition – I’d love to hear from you! Enjoy these little bites of holiday cheer and spread the sweetness with friends and family.
Print
Festive Rocky Road Bites: Holiday Candy Cup Treats
Description
Hello and welcome! 🎉 If you’re looking for a delightful, no-bake treat perfect for the holiday season, you’ve come to the right place. These Festive Rocky Road Bites, also known as Holiday Rocky Road Candy Cups, are the ultimate crowd-pleasers! Not only are they packed with delicious chocolate, marshmallows, and nuts, but they’re also topped with vibrant holiday candies and sprinkles, making them as festive as they are tasty. Let’s get ready to make a holiday treat that will light up any gathering!
Ingredients
- 2 cups semi-sweet chocolate chips – For a rich chocolate base.
- 1/2 cup white chocolate chips – Adds a touch of sweetness and a beautiful contrast.
- 1/2 cup chopped peanuts – Feel free to substitute with almonds, walnuts, or pecans for a nutty crunch.
- 1/2 cup mini marshmallows – Essential for that chewy Rocky Road texture.
- 1/4 cup red and green candy-coated chocolates – Adds festive colors; you can use mini M&Ms or any candy of choice.
- 2 tablespoons holiday sprinkles – Adds a joyful touch; choose sprinkles in red, green, and white for a holiday theme.
Optional Substitutions:
- Swap semi-sweet chocolate with milk or dark chocolate, depending on your preference.
- For a nut-free version, use chopped pretzels or coconut flakes.
Instructions
Step 1: Prepare the Muffin Tin
- Line a mini muffin tin with festive holiday paper liners. This will help in creating the perfect bite-sized candy cups and make them easy to serve.
Step 2: Melt the Chocolate
- In a microwave-safe bowl, add the semi-sweet chocolate chips. Melt in 30-second increments, stirring in between, until smooth. This method prevents the chocolate from burning. Alternatively, melt the chocolate using a double boiler.
Step 3: Mix the Ingredients
- Once the chocolate is melted and smooth, add in the chopped peanuts, mini marshmallows, and half of the white chocolate chips. Stir well to ensure all ingredients are coated in the chocolate mixture.
Step 4: Fill the Muffin Liners
- Carefully spoon the mixture into the prepared mini muffin liners, pressing gently to fill each cup. This step is crucial to pack each bite full of holiday goodness.
Step 5: Add the Festive Toppings
- Top each cup with a sprinkle of the remaining white chocolate chips, red and green candy-coated chocolates, and a dash of holiday sprinkles for extra festive flair.
Step 6: Chill and Set
- Place the muffin tin in the refrigerator for 30 minutes or until the bites are set. Once ready, these treats will have a satisfying crunch with every bite.
Equipment

2Pcs Heart Shape Cake Pans, Aluminum Heart Cake Mold, Reusable 10 inch
Buy Now →
Kids Chill Leak-Proof Lunch Box – Included Reusable Ice Pack Keeps Food Cold
Buy Now →Notes
- Use Quality Chocolate: High-quality chocolate chips make a difference in taste and texture. Opt for chocolate brands you love for the best results.
- Microwave in Intervals: Melting chocolate slowly in the microwave prevents it from scorching.
- Chill Thoroughly: Ensure your bites are firm and easy to handle by letting them set completely in the fridge.


