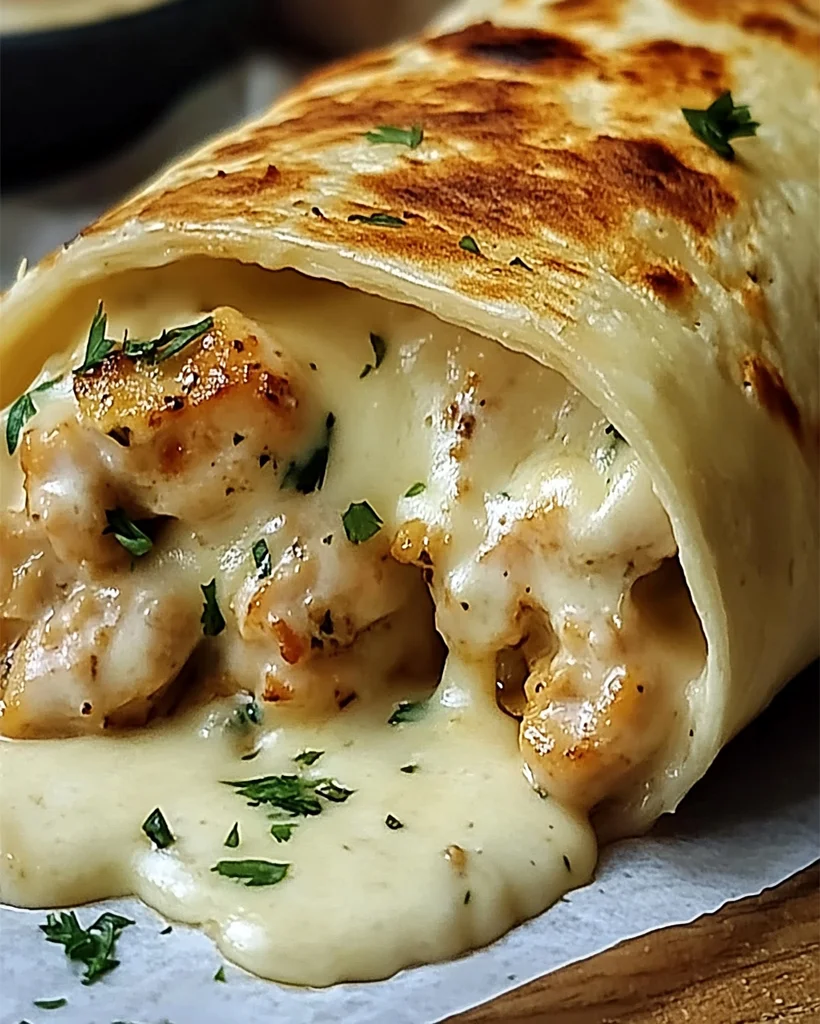
Hello food lovers! Get ready to indulge in an irresistible flavor combination with these delicious Cheesy Garlic Chicken Wraps. If you’re a fan of cheesy, garlicky goodness paired with tender chicken, then this recipe is for you. Whether you are meal prepping or making a quick dinner, these wraps are your new go-to favorite. Let’s dive into this simple yet incredibly flavorful recipe that’s bound to become a staple in your kitchen!
Introduction
Looking for a dish that’s not only delicious but also comforting? Cheesy Garlic Chicken Wraps are the perfect solution. These wraps blend the savory, garlicky chicken with gooey, melted cheeses and fresh spinach, creating a hearty and nutritious meal. While reminiscent of classic cheesesteaks, these wraps stand out with a garlicky twist and an easy-to-follow recipe that takes less than an hour to make. They’re perfect for weeknight dinners or meal-prepping for busy days.
If you enjoy flavorful chicken dishes, you will love this recipe for Cheesy Garlic Chicken Wraps. The dish is easy to make, incredibly satisfying, and a great way to mix up your weekly menu. Plus, it pairs wonderfully with a variety of sides, from salads to roasted vegetables. For an extra dose of indulgence, you can serve it alongside a dipping sauce like this Chick-fil-A Sauce Recipe for added flavor!
Ingredients for Cheesy Garlic Chicken Wraps
Here’s everything you’ll need to make Cheesy Garlic Chicken Wraps. Don’t worry—most of these ingredients are pantry staples, and there’s room for some substitutions depending on your dietary needs.
Chicken:
- 2 boneless, skinless chicken breasts
- 1 tbsp olive oil
- 1 tsp garlic powder
- 1 tsp onion powder
- ½ tsp paprika
- Salt and pepper, to taste
Filling:
- 1 cup shredded mozzarella cheese
- ½ cup shredded cheddar cheese
- 3 cloves garlic, minced
- ¼ cup cream cheese, softened
- ¼ cup sour cream
- 4 large flour tortillas
- 1 cup fresh spinach leaves
Cooking the Wraps:
- 2 tbsp butter
- 1 tbsp olive oil
Optional Substitutions:
- Gluten-Free Option: Use gluten-free tortillas.
- Dairy-Free Option: Substitute the cheeses with plant-based versions and use coconut cream in place of sour cream.
- Low-Carb Option: Replace tortillas with lettuce leaves for a low-carb version.
How to Make Cheesy Garlic Chicken Wraps – Step by Step
Here’s how to make these irresistible Cheesy Garlic Chicken Wraps. You’ll be surprised by how easy it is to create a dish that tastes this good!
Step 1: Prepare the Chicken
Begin by seasoning both sides of the chicken breasts with garlic powder, onion powder, paprika, salt, and pepper. Heat olive oil in a skillet over medium heat. Once hot, add the chicken breasts and cook for about 5-6 minutes per side, until fully cooked. The internal temperature should reach 165°F (74°C).
Pro Tip: Let the chicken rest for 5 minutes before shredding to retain its juices.
Step 2: Prepare the Filling
While the chicken rests, prepare the filling. In a medium bowl, mix the shredded mozzarella, cheddar cheese, minced garlic, cream cheese, and sour cream. Stir until smooth and creamy. After the chicken has rested, shred it into small pieces and add it to the cheese mixture. Stir until everything is well combined.
Step 3: Assemble the Wraps
Lay each tortilla flat and place a layer of fresh spinach leaves on top. Spoon the cheesy chicken mixture into the center of each tortilla, then tightly roll them into wraps. Make sure the filling is evenly distributed for that perfect bite every time!
Step 4: Cook the Wraps
In a skillet, heat butter and olive oil over medium heat. Place the wraps seam-side down and cook for 2-3 minutes per side, or until golden brown and crispy. The cheese should be melted and gooey.
Helpful Tips for Cheesy Garlic Chicken Wraps
- Use Fresh Garlic: Freshly minced garlic provides a robust flavor that you can’t achieve with garlic powder alone.
- Cook Wraps Seam-Side Down First: This ensures the wraps stay closed during cooking.
- Make-Ahead Option: You can prepare the chicken and filling ahead of time and assemble the wraps when you’re ready to eat.
- Freeze for Later: Make extra wraps and freeze them for a quick meal option. Just reheat in the skillet or oven for a crispy finish.
Cooking Tips for the Best Cheesy Garlic Chicken Wraps
To take your Cheesy Garlic Chicken Wraps to the next level, here are some cooking techniques and equipment hacks:
- Use a Cast Iron Skillet: It evenly distributes heat and gives the wraps a perfect crispy exterior.
- Preheat the Pan Properly: Make sure your pan is hot before adding the wraps to get that nice golden crust.
- Use a Panini Press: For an extra crispy, evenly cooked wrap, a panini press works wonders.
Serving Suggestions for Cheesy Garlic Chicken Wraps
These wraps pair wonderfully with a variety of side dishes and dips. Here are some ideas:
- Dipping Sauce: Serve with marinara sauce or ranch dressing for dipping. For a flavorful twist, try this Chick-fil-A Sauce Recipe.
- Side Salad: A simple side salad with a light vinaigrette will complement the richness of the wraps.
- Roasted Vegetables: Serve with a side of roasted vegetables like carrots or zucchini for a balanced meal.
Nutritional Information
Cheesy Garlic Chicken Wraps offer a great balance of protein, carbs, and fats, making them a filling and satisfying meal. The fresh spinach adds a boost of vitamins, while the cheeses provide calcium and other nutrients.
Nutritional Info (Per Serving):
- Calories: 450
- Protein: 30g
- Fats: 25g
- Carbohydrates: 35g
- Fiber: 4g
- Calcium: 150mg
Storage and Leftovers for Cheesy Garlic Chicken Wraps
To store your Cheesy Garlic Chicken Wraps, simply wrap them individually in foil or plastic wrap and refrigerate for up to 3 days. When you’re ready to enjoy them again, reheat them in a skillet over medium heat or in the oven at 350°F (175°C) until warm and crispy.
Freezing Instructions:
- Wrap each in aluminum foil and store in a freezer-safe bag for up to 3 months.
- To reheat, place them directly into the oven or skillet from frozen, heating until the center is warmed through.
Frequently Asked Questions (FAQs) for Cheesy Garlic Chicken Wraps
- Can I use pre-cooked chicken?
Yes! Using pre-cooked chicken is a great time-saver for this recipe. Just shred and season it as directed. - Can I make these wraps dairy-free?
Absolutely! Substitute the cheeses with your favorite dairy-free alternatives and use coconut cream instead of sour cream. - Can I make these wraps gluten-free?
Definitely! Just use gluten-free tortillas. - Can I add extra veggies?
Feel free to add sliced bell peppers, mushrooms, or onions for extra flavor and nutrition.
Related Recipes for Cheesy Garlic Chicken Wrap Lovers
Looking for more chicken wrap inspiration? Check out these related recipes:
- Baked Chicken Chimichangas – Easy and Delicious
Try this baked version of chimichangas, stuffed with chicken, cheese, and spices, for a lighter take on the classic dish. - Crispy Pepperoni Pizza Panini – Easy Cheesy Recipe
If you love cheesy wraps, this crispy panini recipe with pepperoni and melted cheese is a must-try!
Conclusion
I hope you’re excited to try this Cheesy Garlic Chicken Wraps recipe! It’s packed with flavor, easy to make, and customizable to suit any dietary needs. Whether you’re serving these for lunch, dinner, or as a snack, they’re sure to be a hit with everyone. Let me know in the comments below if you’ve made this recipe or tried a different twist on it. I’d love to hear your feedback!
Enjoy cooking, and don’t forget to share your experience!
Print
Cheesy Garlic Chicken Wraps Recipe – Quick & Easy Meal
Description
Hello food lovers! Get ready to indulge in an irresistible flavor combination with these delicious Cheesy Garlic Chicken Wraps. If you’re a fan of cheesy, garlicky goodness paired with tender chicken, then this recipe is for you. Whether you are meal prepping or making a quick dinner, these wraps are your new go-to favorite. Let’s dive into this simple yet incredibly flavorful recipe that’s bound to become a staple in your kitchen!
Ingredients
For the Chicken:
- 2 boneless, skinless chicken breasts
- 1 tbsp olive oil
- 1 tsp garlic powder
- 1 tsp onion powder
- ½ tsp paprika
- Salt and pepper, to taste
For the Filling:
- 1 cup shredded mozzarella cheese
- ½ cup shredded cheddar cheese
- 3 cloves garlic, minced
- ¼ cup cream cheese, softened
- ¼ cup sour cream
- 4 large flour tortillas
- 1 cup fresh spinach leaves
For Cooking the Wraps:
- 2 tbsp butter
- 1 tbsp olive oil
Optional Substitutions:
- Gluten-Free Option: Use gluten-free tortillas.
- Dairy-Free Option: Substitute the cheeses with plant-based versions and use coconut cream in place of sour cream.
- Low-Carb Option: Replace tortillas with lettuce leaves for a low-carb version.
Instructions
Step 1: Prepare the Chicken
Begin by seasoning both sides of the chicken breasts with garlic powder, onion powder, paprika, salt, and pepper. Heat olive oil in a skillet over medium heat. Once hot, add the chicken breasts and cook for about 5-6 minutes per side, until fully cooked. The internal temperature should reach 165°F (74°C).
Pro Tip: Let the chicken rest for 5 minutes before shredding to retain its juices.
Step 2: Prepare the Filling
While the chicken rests, prepare the filling. In a medium bowl, mix the shredded mozzarella, cheddar cheese, minced garlic, cream cheese, and sour cream. Stir until smooth and creamy. After the chicken has rested, shred it into small pieces and add it to the cheese mixture. Stir until everything is well combined.
Step 3: Assemble the Wraps
Lay each tortilla flat and place a layer of fresh spinach leaves on top. Spoon the cheesy chicken mixture into the center of each tortilla, then tightly roll them into wraps. Make sure the filling is evenly distributed for that perfect bite every time!
Step 4: Cook the Wraps
In a skillet, heat butter and olive oil over medium heat. Place the wraps seam-side down and cook for 2-3 minutes per side, or until golden brown and crispy. The cheese should be melted and gooey.
Equipment

2Pcs Heart Shape Cake Pans, Aluminum Heart Cake Mold, Reusable 10 inch
Buy Now →
Kids Chill Leak-Proof Lunch Box – Included Reusable Ice Pack Keeps Food Cold
Buy Now →Notes
- Use Fresh Garlic: Freshly minced garlic provides a robust flavor that you can’t achieve with garlic powder alone.
- Cook Wraps Seam-Side Down First: This ensures the wraps stay closed during cooking.
- Make-Ahead Option: You can prepare the chicken and filling ahead of time and assemble the wraps when you’re ready to eat.
- Freeze for Later: Make extra wraps and freeze them for a quick meal option. Just reheat in the skillet or oven for a crispy finish.
