
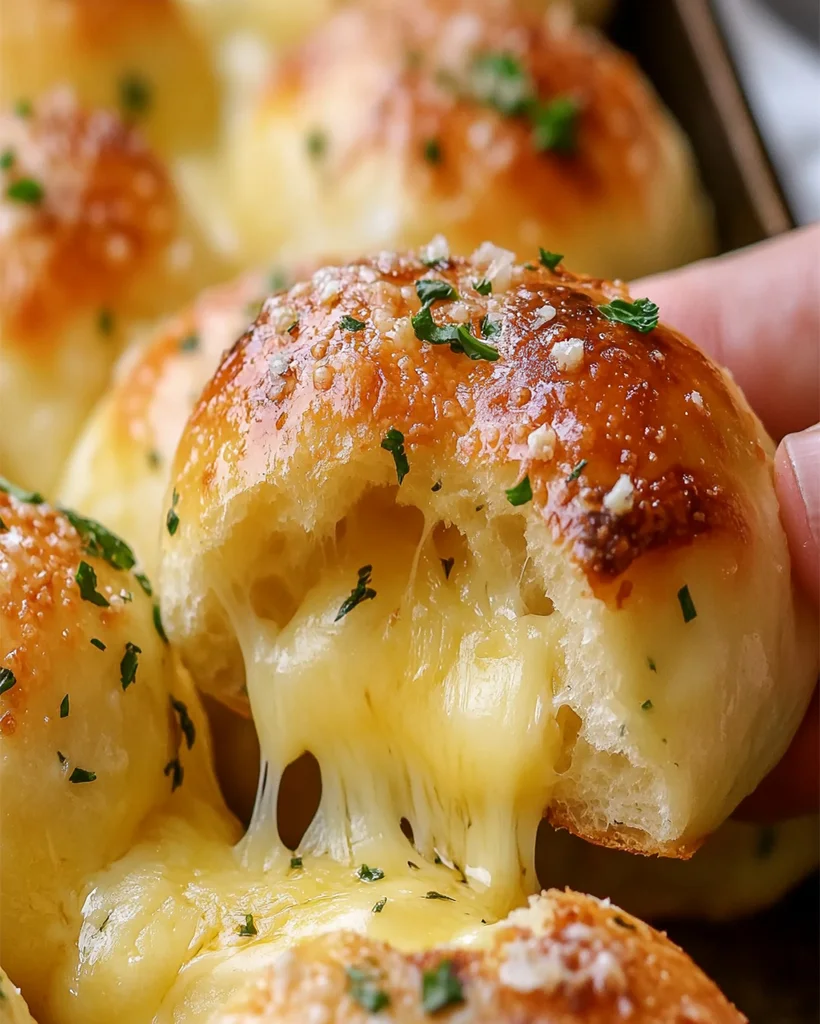
If you’re a fan of indulgent, cheesy treats, then this Cheesy Bombs recipe is a must-try. With their crispy exterior and gooey, melted cheese center, these bites are perfect for any occasion—from family gatherings to casual snacks. In this article, I’ll walk you through the process of making these irresistible Cheesy Bombs step-by-step. So, roll up your sleeves and get ready to bake a batch of deliciousness!
Introduction: Discover the Delight of Cheesy Bombs
Cheesy Bombs have become a beloved appetizer or snack for those who adore the combination of soft dough and melted cheese. Originating as a comfort food, they are now a popular choice for anyone craving a bite-sized treat that packs a flavor punch. Whether served as a side dish, party appetizer, or a quick snack, these cheesy delights are sure to win over hearts and taste buds alike.
Ingredients for Making Cheesy Bombs
Here’s What You’ll Need:
- 8 frozen Texas rolls (thawed, Rhodes brand recommended)
- 4 sticks of mozzarella cheese, cut into 16 pieces
- 4 tablespoons of salted butter, melted
- 2 cloves of garlic, minced
- 1 tablespoon of parsley flakes (freshly chopped or dried)
Optional Additions:
- Pepperoni slices or bacon bits for extra flavor.
- Swap mozzarella with cheddar or pepper jack for a spicy kick.
Feel free to adapt this recipe based on your personal preferences or dietary restrictions!
How to Make Cheesy Bombs – Step by Step
Step-by-Step Instructions for Perfect Cheesy Bombs:
Step1: Place the frozen rolls on a plate, cover with plastic wrap, and refrigerate for at least 4 hours or overnight.
Step2: Preheat your oven to 350°F (175°C) and line a baking sheet with parchment paper.
Step3: Cut the mozzarella sticks into approximately 1-inch pieces.
Step4: Using your hands, flatten each dough ball into a round disk.
Step5: Place two pieces of cheese in the center of each flattened dough disk.
Step6: Pinch the edges firmly together to seal in the cheese, ensuring no gaps. Place the sealed dough balls seam-side down on the baking sheet.
Step7: Bake the rolls for 9-11 minutes, or until they start to brown.
Step8: While the rolls are baking, melt the butter in a microwave-safe dish or saucepan. Stir in the minced garlic and parsley flakes once the butter is melted.
Step9: After the rolls are browned, remove them from the oven and brush each one evenly with the garlic butter mixture.
Step10: Allow the cheesy garlic bombs to cool slightly before serving.
Tips for Success:
- Make sure to seal the edges well to prevent the cheese from oozing out.
- If you like a stronger garlic flavor, add a pinch of garlic powder to the butter mixture.
Helpful Tips for Cheesy Bombs
Want to Take Your Cheesy Bombs to the Next Level?
- Experiment with Fillings: Add small pieces of pepperoni or sautéed mushrooms for a flavor twist.
- Serve with Dips: Pair these bombs with marinara, ranch dressing, or a spicy sriracha mayo.
- Make Ahead: Prepare and freeze unbaked bombs. Simply bake them straight from the freezer, adding a few extra minutes to the cooking time.
Cooking Tips for the Best Cheesy Bombs
Perfect Techniques for Delicious Cheesy Bombs:
- Use Cold Cheese: Cold cheese cubes melt slower, allowing the dough to cook evenly without spilling.
- Seal Tightly: Always double-check the seams to prevent cheese leakage.
- Brush Butter Generously: This adds a rich, golden finish and enhances flavor.
Serving Suggestions for Cheesy Bombs
These cheesy delights are versatile and can be served as:
- Appetizers: Pair them with a selection of dips like marinara sauce or spicy mustard.
- Party Snacks: Arrange them in a basket and serve warm.
- Side Dish: Complement hearty soups or salads with these cheesy bites.
For a full meal, serve alongside a simple Caesar salad and a refreshing lemonade.
Nutritional Information for Cheesy Bombs
While these cheesy bites are indulgent, they can be part of a balanced diet when enjoyed in moderation. Packed with protein and a good source of calcium, they offer a delicious treat for cheese lovers.
Nutritional Information (per serving)
- Calories: 120 kcal
- Fats: 8g
- Carbs: 15g
- Protein: 5g
- Vitamins: A, C, and Calcium
For a lower-calorie option, use reduced-fat cheese and replace butter with olive oil.
Storage and Leftovers for Cheesy Bombs
How to Store and Reheat Cheesy Bombs:
- Refrigerate: Store leftover cheesy bombs in an airtight container in the refrigerator for up to 3 days.
- Reheat: Warm them in the oven at 350°F for 5-7 minutes, or microwave on medium power for 20-30 seconds.
Can You Freeze Cheesy Bombs?
Yes! Place the baked bombs in a freezer-safe bag and freeze for up to 2 months. Reheat directly from frozen in the oven.
Frequently Asked Questions (FAQs) for Cheesy Bombs
1. Can I use other types of cheese?
Absolutely! Cheddar, gouda, or pepper jack are all delicious options.
2. How do I prevent cheese from leaking out?
Make sure to seal the dough edges tightly, pinching them together firmly.
3. Can I make these ahead of time?
Yes, you can prepare them up to the baking stage and freeze for later use.
4. What dips pair well with cheesy bombs?
Marinara, ranch, and garlic aioli are excellent choices.
Related Recipes for Cheese Lovers
Check out these recipes if you love cheesy goodness:
- Sausage Balls Recipe with Red Lobster Mix
: A savory and cheesy delight perfect for any gathering.
- Ultimate Cowboy Casserole
: Hearty and cheesy, this casserole is a true comfort food.
Conclusion: Try This Cheesy Bombs Recipe Today!
I hope you enjoy making and devouring these Cheesy Bombs. They are not only fun to prepare but are sure to be a crowd-pleaser. Give them a try, and don’t forget to share your own twists and tips in the comments. Happy cooking!
Print
Cheesy Bombs Recipe – Irresistible Cheesy Appetizer Bites
Description
If you’re a fan of indulgent, cheesy treats, then this Cheesy Bombs recipe is a must-try. With their crispy exterior and gooey, melted cheese center, these bites are perfect for any occasion—from family gatherings to casual snacks. In this article, I’ll walk you through the process of making these irresistible Cheesy Bombs step-by-step. So, roll up your sleeves and get ready to bake a batch of deliciousness!
Ingredients
Here’s What You’ll Need:
- 8 frozen Texas rolls (thawed, Rhodes brand recommended)
- 4 sticks of mozzarella cheese, cut into 16 pieces
- 4 tablespoons of salted butter, melted
- 2 cloves of garlic, minced
- 1 tablespoon of parsley flakes (freshly chopped or dried)
Optional Additions:
- Pepperoni slices or bacon bits for extra flavor.
- Swap mozzarella with cheddar or pepper jack for a spicy kick.
Feel free to adapt this recipe based on your personal preferences or dietary restrictions!
Instructions
Step 1: Place the frozen rolls on a plate, cover with plastic wrap, and refrigerate for at least 4 hours or overnight.
Step 2: Preheat your oven to 350°F (175°C) and line a baking sheet with parchment paper.
Step 3: Cut the mozzarella sticks into approximately 1-inch pieces.
Step 4: Using your hands, flatten each dough ball into a round disk.
Step 5: Place two pieces of cheese in the center of each flattened dough disk.
Step 6: Pinch the edges firmly together to seal in the cheese, ensuring no gaps. Place the sealed dough balls seam-side down on the baking sheet.
Step 7: Bake the rolls for 9-11 minutes, or until they start to brown.
Step 8: While the rolls are baking, melt the butter in a microwave-safe dish or saucepan. Stir in the minced garlic and parsley flakes once the butter is melted.
Step 9: After the rolls are browned, remove them from the oven and brush each one evenly with the garlic butter mixture.
Step 10: Allow the cheesy garlic bombs to cool slightly before serving.
Tips for Success:
- Make sure to seal the edges well to prevent the cheese from oozing out.
- If you like a stronger garlic flavor, add a pinch of garlic powder to the butter mixture.
Equipment

2Pcs Heart Shape Cake Pans, Aluminum Heart Cake Mold, Reusable 10 inch
Buy Now →
Kids Chill Leak-Proof Lunch Box – Included Reusable Ice Pack Keeps Food Cold
Buy Now →Notes
- Experiment with Fillings: Add small pieces of pepperoni or sautéed mushrooms for a flavor twist.
- Serve with Dips: Pair these bombs with marinara, ranch dressing, or a spicy sriracha mayo.
- Make Ahead: Prepare and freeze unbaked bombs. Simply bake them straight from the freezer, adding a few extra minutes to the cooking time.
