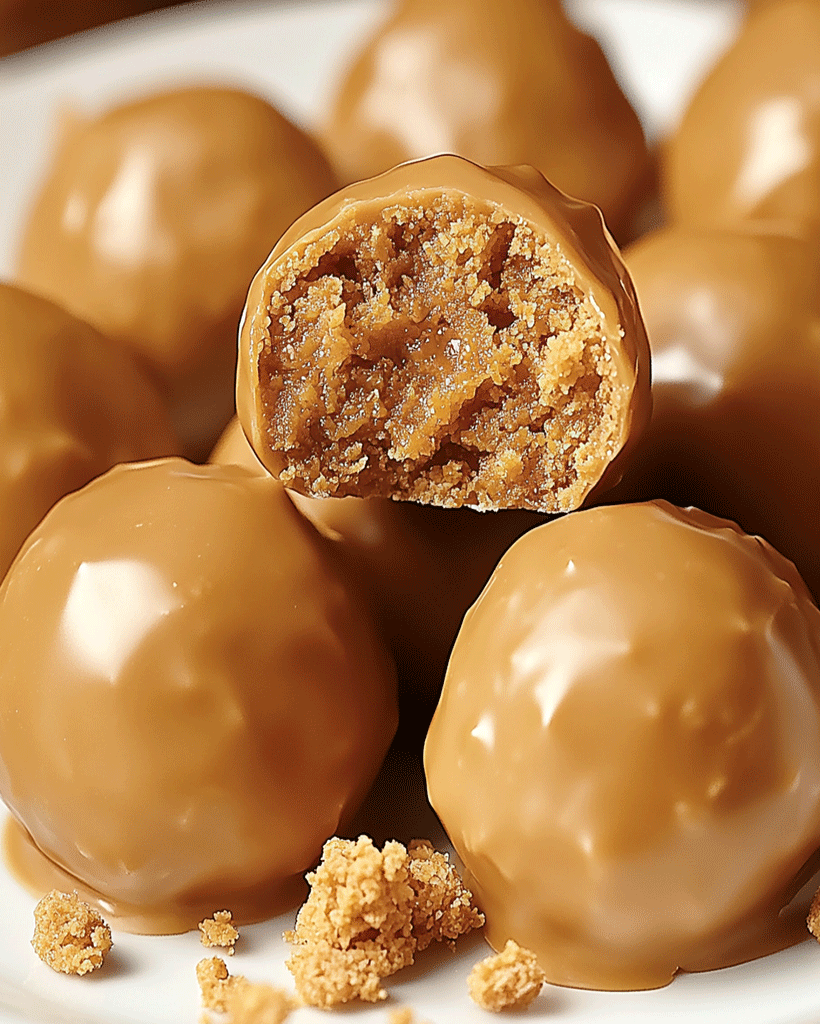
Welcome, sweet-tooth enthusiasts! If you’re a fan of peanut butter, chocolate, and the classic crunch of Butterfinger, these No-Bake Butterfinger Balls will be your new favorite treat! These delicious bites are perfect for anyone craving a quick, no-bake dessert that’s as fun to make as it is to eat. So, if you’re looking for a delightful way to satisfy your candy cravings, you’re in the right place—let’s dive into this tasty recipe!
Introduction
No-Bake Butterfinger Balls are a delicious twist on classic chocolate truffles, combining smooth peanut butter with the crispy, caramelized crunch of crushed Butterfinger candy bars. This recipe brings together creamy peanut butter and a delightful chocolate coating in a way that fans of no-bake desserts and peanut butter snacks will love. Perfect for quick gatherings or anytime you’re craving a little sweet indulgence, these treats have become a favorite among candy lovers everywhere!
Ingredients for No-Bake Butterfinger Balls
These No-Bake Butterfinger Balls require just a few simple ingredients that you probably already have on hand. Here’s everything you need to make this quick and easy dessert:
- 1 cup creamy peanut butter – Smooth and creamy, it adds a rich, nutty base for the Butterfinger balls.
- 2 cups powdered sugar – This gives the mixture structure and sweetness, making the balls hold their shape.
- 1 teaspoon vanilla extract – Enhances the flavor with a subtle depth.
- 2 cups crushed Butterfinger candy bars – Adds that classic Butterfinger crunch and flavor.
- 12 oz milk chocolate, melted – For coating the Butterfinger balls with a rich chocolate shell.
Optional Substitutions:
- Swap almond butter or sunflower seed butter for a nut-free or peanut-free version.
- Use dark chocolate instead of milk chocolate for a more intense chocolate flavor.
How to Make No-Bake Butterfinger Balls – Step by Step
Creating these delightful No-Bake Butterfinger Balls is quick and easy. Follow these steps to make your very own sweet treats!
Step 1: Prepare the Peanut Butter Mixture
In a large mixing bowl, combine the creamy peanut butter, powdered sugar, and vanilla extract. Mix well until all ingredients are fully combined and the mixture is smooth.
Step 2: Add the Butterfinger Crunch
Add the crushed Butterfinger candy bars to the peanut butter mixture, stirring until the candy pieces are evenly distributed. This step ensures every bite has that irresistible Butterfinger crunch.
Step 3: Shape the Balls
Scoop out small portions of the mixture and roll them into 1-inch balls. Place the balls on a baking sheet lined with parchment paper to prevent sticking.
Step 4: Freeze the Balls
Place the baking sheet in the freezer for about 30 minutes. This helps the balls firm up, making it easier to dip them in chocolate later.
Step 5: Dip in Chocolate
Melt the milk chocolate in a microwave-safe bowl, stirring every 20 seconds until smooth. Take the balls out of the freezer and dip each one in the melted chocolate, using a fork to coat them thoroughly. Let any excess chocolate drip off before placing them back on the parchment paper.
Step 6: Set the Chocolate
Allow the chocolate coating to set by placing the Butterfinger balls in the refrigerator for 15 minutes or until the chocolate is firm.
Helpful Tips for No-Bake Butterfinger Balls
- Use Cold Peanut Butter: This helps the mixture firm up faster, making it easier to shape into balls.
- Crush Butterfinger Bars Finely: Finer pieces of candy bars distribute more evenly, giving each bite the perfect amount of Butterfinger crunch.
- Experiment with Chocolate: If you’re a dark chocolate fan, try substituting dark chocolate for the milk chocolate.
Cooking Tips for the Best No-Bake Butterfinger Balls
- Work Quickly: When dipping in chocolate, work swiftly to ensure the balls don’t soften and lose their shape.
- Chill in Stages: Freezing the balls before and after coating in chocolate helps the dessert maintain a firm and stable shape.
- Add a Little Coconut Oil: Mixing a small amount of coconut oil with the melted chocolate can make the coating smoother and shinier.
Serving Suggestions for No-Bake Butterfinger Balls
These No-Bake Butterfinger Balls make a fantastic addition to dessert platters or snack trays. Serve them with:
- Coffee or Hot Cocoa: A warm drink pairs well with the sweetness of these chocolatey treats.
- Fruit Platter: The fresh flavors of fruits like strawberries and grapes balance the richness of the Butterfinger balls.
- Mini Dessert Tray: Combine them with other small, bite-sized treats like chocolate-covered pretzels or brownie bites for a sweet variety.
Nutritional Information
While these No-Bake Butterfinger Balls are undoubtedly indulgent, they can be enjoyed in moderation as a special treat.
Nutritional Information (per serving):
- Calories: 200
- Total Fat: 12g
- Saturated Fat: 6g
- Carbohydrates: 24g
- Sugars: 18g
- Protein: 4g
Storage and Leftovers for No-Bake Butterfinger Balls
These No-Bake Butterfinger Balls can be easily stored for future enjoyment!
- Refrigeration: Store in an airtight container in the refrigerator for up to one week.
- Freezing: For longer storage, place them in a freezer-safe bag and freeze for up to three months. Let them thaw for a few minutes before serving.
- Reheating: These treats don’t require reheating and are best enjoyed chilled or at room temperature.
Frequently Asked Questions (FAQs) for No-Bake Butterfinger Balls
1. Can I use a different candy bar?
Absolutely! Try substituting Butterfinger with other crispy candy bars like Crunch or Kit Kat for a different twist.
2. Can I make these Butterfinger balls dairy-free?
Yes, by using dairy-free chocolate and a dairy-free butter alternative, you can create a vegan-friendly version.
3. Do I have to freeze the balls before dipping them in chocolate?
Freezing helps them hold their shape, especially when dipping in warm chocolate. It’s a recommended step.
4. How can I prevent the chocolate from cracking?
Let the chocolate-coated balls set at room temperature for a few minutes before refrigerating them to reduce cracking.
Related Recipes for No-Bake Butterfinger Balls Lovers
Explore more delicious no-bake treats that are just as indulgent and easy to make:
Conclusion
Thank you for following along with this No-Bake Butterfinger Balls Recipe! We hope you enjoyed making these delicious treats and will share your experiences in the comments. Let us know if you added your own twist or have any tips to share. Enjoy your Butterfinger Balls, and remember to check out more recipes on our blog for more delicious no-bake dessert ideas!
Print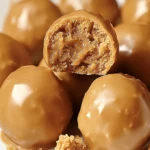
Butterfinger Balls Recipe – Easy No-Bake Sweet Treats
Description
Welcome, sweet-tooth enthusiasts! If you’re a fan of peanut butter, chocolate, and the classic crunch of Butterfinger, these No-Bake Butterfinger Balls will be your new favorite treat! These delicious bites are perfect for anyone craving a quick, no-bake dessert that’s as fun to make as it is to eat. So, if you’re looking for a delightful way to satisfy your candy cravings, you’re in the right place—let’s dive into this tasty recipe!
Ingredients
- 1 cup creamy peanut butter – Smooth and creamy, it adds a rich, nutty base for the Butterfinger balls.
- 2 cups powdered sugar – This gives the mixture structure and sweetness, making the balls hold their shape.
- 1 teaspoon vanilla extract – Enhances the flavor with a subtle depth.
- 2 cups crushed Butterfinger candy bars – Adds that classic Butterfinger crunch and flavor.
- 12 oz milk chocolate, melted – For coating the Butterfinger balls with a rich chocolate shell.
Optional Substitutions:
- Swap almond butter or sunflower seed butter for a nut-free or peanut-free version.
- Use dark chocolate instead of milk chocolate for a more intense chocolate flavor.
Instructions
Step 1: Prepare the Peanut Butter Mixture
In a large mixing bowl, combine the creamy peanut butter, powdered sugar, and vanilla extract. Mix well until all ingredients are fully combined and the mixture is smooth.
Step 2: Add the Butterfinger Crunch
Add the crushed Butterfinger candy bars to the peanut butter mixture, stirring until the candy pieces are evenly distributed. This step ensures every bite has that irresistible Butterfinger crunch.
Step 3: Shape the Balls
Scoop out small portions of the mixture and roll them into 1-inch balls. Place the balls on a baking sheet lined with parchment paper to prevent sticking.
Step 4: Freeze the Balls
Place the baking sheet in the freezer for about 30 minutes. This helps the balls firm up, making it easier to dip them in chocolate later.
Step 5: Dip in Chocolate
Melt the milk chocolate in a microwave-safe bowl, stirring every 20 seconds until smooth. Take the balls out of the freezer and dip each one in the melted chocolate, using a fork to coat them thoroughly. Let any excess chocolate drip off before placing them back on the parchment paper.
Step 6: Set the Chocolate
Allow the chocolate coating to set by placing the Butterfinger balls in the refrigerator for 15 minutes or until the chocolate is firm.
Equipment

2Pcs Heart Shape Cake Pans, Aluminum Heart Cake Mold, Reusable 10 inch
Buy Now →
Kids Chill Leak-Proof Lunch Box – Included Reusable Ice Pack Keeps Food Cold
Buy Now →Notes
- Use Cold Peanut Butter: This helps the mixture firm up faster, making it easier to shape into balls.
- Crush Butterfinger Bars Finely: Finer pieces of candy bars distribute more evenly, giving each bite the perfect amount of Butterfinger crunch.
- Experiment with Chocolate: If you’re a dark chocolate fan, try substituting dark chocolate for the milk chocolate.
