
Welcome to the spookiest cookie recipe you’ll make this Halloween—Witch’s Brew Cookies and Hocus Pocus Halloween Cookies! These delightfully eerie treats are perfect for bringing a touch of magic to your holiday spread. Whether you’re hosting a Halloween party, baking with the kids, or simply indulging your sweet tooth, these cookies are sure to cast a delicious spell on anyone who takes a bite. Let’s dive into this fun and easy-to-make recipe that will enchant your kitchen with its wickedly good flavors.
Introduction
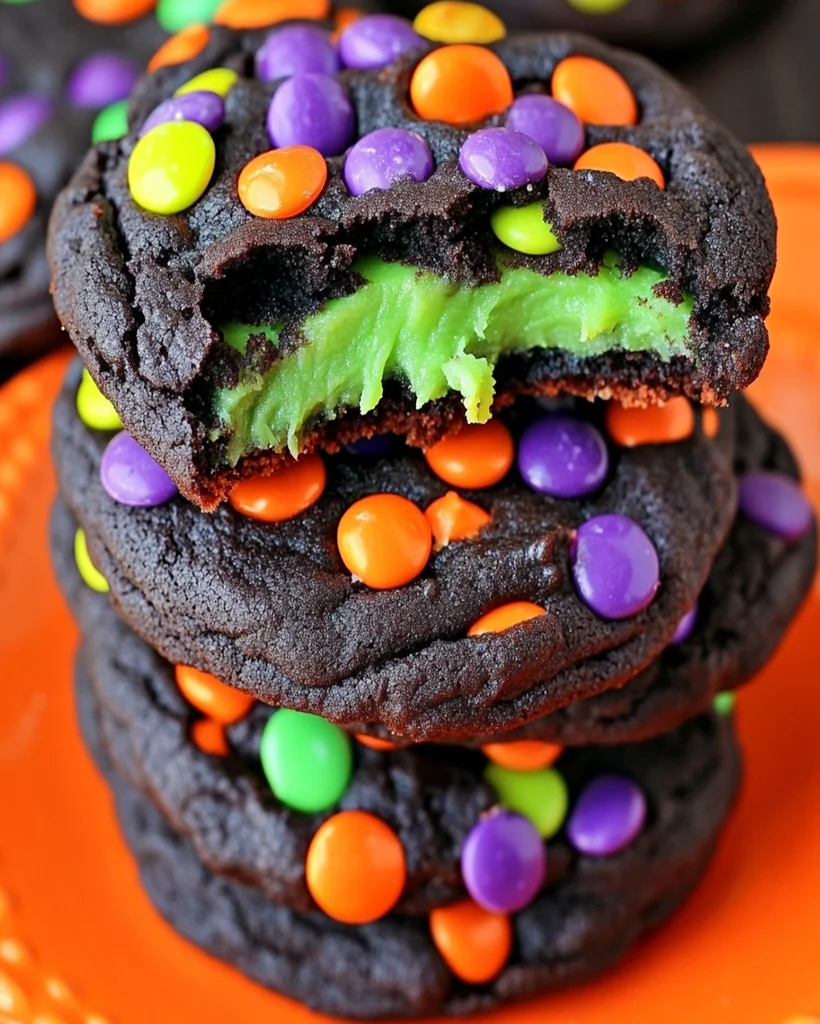
There’s something magical about Halloween that brings out the creative side of baking, and these Witch’s Brew Cookies are no exception. Inspired by the bubbling cauldrons of witches and the enchanting colors of the Halloween season, these cookies are both delicious and festive. With a rich chocolate base and pops of green, orange, and purple from candy-coated chocolates, they embody the spirit of Hocus Pocus and other classic Halloween tales.
Perfect for cookie decorating parties or serving as a spooky snack, these Halloween-themed cookies are a must-try for anyone who loves to get creative in the kitchen during this magical season. They’re not only fun to make but also full of delicious flavors, making them a great treat for kids and adults alike. Plus, the neon green filling adds a bit of surprise, making every bite a delight!
Ingredients for Witch’s Brew Cookies
Here’s everything you need to create these Hocus Pocus Halloween Cookies at home. This recipe is easily adjustable for different dietary preferences, so feel free to swap ingredients where needed.
- 1 ½ cups all-purpose flour
- ½ cup unsweetened cocoa powder – for that rich chocolatey base.
- 1 teaspoon baking soda – helps give the cookies their soft, chewy texture.
- ¼ teaspoon salt
- ½ cup unsalted butter, softened – ensures your cookies are rich and buttery.
- ¾ cup granulated sugar – adds sweetness.
- 1 large egg – to bind the ingredients together.
- 1 teaspoon vanilla extract – enhances the overall flavor.
- ¼ cup milk – to keep the dough moist and soft.
- ½ cup candy-coated chocolates – in spooky green, orange, and purple for a festive touch.
- ½ cup neon green filling – optional but recommended! Use green-tinted white chocolate ganache or neon green frosting for a truly magical look.
Optional Substitutions:
- For a gluten-free option, substitute the all-purpose flour with a gluten-free flour blend.
- Dairy-free bakers can use plant-based butter and milk alternatives, such as almond milk.
How to Make Witch’s Brew Cookies – Step by Step
Making Witch’s Brew Cookies is both simple and fun! Here’s a step-by-step guide on how to whip up a batch of these magical treats.
Step 1: Preheat Your Oven
Preheat your oven to 350°F (175°C) and line a baking sheet with parchment paper. This ensures the cookies won’t stick and will bake evenly.
Step 2: Mix Dry Ingredients
In a medium-sized bowl, whisk together 1 ½ cups all-purpose flour, ½ cup unsweetened cocoa powder, 1 teaspoon baking soda, and ¼ teaspoon salt. Set aside.
Step 3: Cream Butter and Sugar
In a separate bowl, using an electric mixer or by hand, cream together ½ cup softened unsalted butter and ¾ cup granulated sugar until light and fluffy—about 3-4 minutes. This step helps create a soft and chewy texture.
Step 4: Add Egg and Vanilla
Mix in 1 large egg and 1 teaspoon vanilla extract until fully combined.
Step 5: Combine Wet and Dry Ingredients
Gradually add the dry ingredient mixture to the wet ingredients, alternating with ¼ cup milk, mixing until a soft dough forms.
Step 6: Add Candy-Coated Chocolates
Gently fold in ½ cup candy-coated chocolates (green, orange, and purple). This gives the cookies their signature Halloween look.
Step 7: Shape and Add Green Filling
Scoop out dough balls (about 2 tablespoons each) and place them on the prepared baking sheet. Using your thumb, create a small indentation in the center of each cookie. Fill the indentation with a dollop of neon green filling.
Step 8: Add Extra Chocolates
Top each cookie with additional candy-coated chocolates for an extra festive touch.
Step 9: Bake
Bake the cookies for 10-12 minutes, or until the edges are firm but the centers are still soft. Allow them to cool on the baking sheet for a few minutes before transferring them to a wire rack to cool completely.
Helpful Tips for Witch’s Brew Cookies
- Chill the Dough: For thicker cookies, chill the dough for 30 minutes before baking. This helps the cookies maintain their shape and prevents excessive spreading.
- Filling Options: If you don’t have neon green filling on hand, you can tint some melted white chocolate or frosting with a few drops of green food coloring.
- Use Room Temperature Ingredients: For best results, make sure your butter and egg are at room temperature before starting. This ensures even mixing and a smoother dough.
- Don’t Overbake: Keep an eye on the cookies—overbaking will result in dry cookies. The cookies should still be soft in the middle when you take them out of the oven.
Cooking Tips for the Best Witch’s Brew Cookies
- Mixing Technique: When adding dry ingredients to the wet, do so gradually to avoid overmixing, which can lead to tougher cookies.
- Measuring Flour: Be sure to measure your flour correctly. Spoon it into your measuring cup and level it off with a knife to avoid adding too much, which can make the cookies dense.
- Baking Sheets: Use a light-colored baking sheet to prevent the cookies from browning too much on the bottom. Dark baking sheets absorb more heat and can overcook the bottoms.
Serving Suggestions for Witch’s Brew Cookies
These Halloween cookies are perfect for a spooky snack table or Halloween party! Serve them alongside a mug of hot chocolate or a festive Halloween punch. For a complete Halloween-themed dessert table, pair these cookies with other festive treats like spider web cupcakes or candy corn bark. They also make fantastic gifts—simply wrap them in clear cellophane and tie them with orange and black ribbons for a sweet and spooky treat bag!
Nutritional Information
These cookies are not just a fun treat—they also have some nutritional value when enjoyed in moderation.
Per Serving (1 cookie):
- Calories: 150
- Total Fat: 7g
- Saturated Fat: 4g
- Carbohydrates: 20g
- Sugars: 14g
- Protein: 2g
Storage and Leftovers for Witch’s Brew Cookies
These Witch’s Brew Cookies can be stored in an airtight container at room temperature for up to 5 days. If you want to prepare them ahead of time, the dough can be frozen for up to 3 months. Just roll the dough into balls, place them on a baking sheet, and freeze. Once solid, transfer them to a freezer-safe bag. To bake, simply add a minute or two to the baking time. Reheat leftover cookies in the microwave for 10-15 seconds for that fresh-out-of-the-oven warmth.
4 Frequently Asked Questions (FAQs) for Witch’s Brew Cookies
1. Can I make these cookies gluten-free?
Yes, simply replace the all-purpose flour with a 1:1 gluten-free baking flour blend. Be sure to check other ingredients like candy-coated chocolates for any hidden gluten.
2. What’s the best substitute for butter in this recipe?
You can use a dairy-free butter substitute like margarine or coconut oil if you’re avoiding dairy.
3. Can I make the dough ahead of time?
Absolutely! You can prepare the dough and refrigerate it for up to 48 hours or freeze it for longer storage.
4. Can I use other colors for the candy-coated chocolates?
Definitely! Feel free to get creative with your color choices. You can even use red and white for a Christmas version or pastel colors for spring.
Related Recipes for Witch’s Brew Cookie Lovers
Here are two more fun and festive cookie recipes you’ll love:
Conclusion
Ready to cast a spell on your Halloween dessert table? These Witch’s Brew Cookies are a delightfully spooky treat that’s as fun to make as it is to eat. With a rich chocolate base, candy-coated chocolate gems, and a pop of neon green filling, they’re perfect for all ages. Whether you’re baking for a party, making treats with the kids, or just looking for a festive way to celebrate the season, these cookies are a must-try.
Have you tried these cookies or put your own twist on the recipe? We’d love to hear about your Witch’s Brew Cookies creations—share your variations in the comments below!
Print
Witch’s Brew Cookies Recipe | Fun Hocus Pocus Halloween Treats
Description
Welcome to the spookiest cookie recipe you’ll make this Halloween—Witch’s Brew Cookies and Hocus Pocus Halloween Cookies! These delightfully eerie treats are perfect for bringing a touch of magic to your holiday spread. Whether you’re hosting a Halloween party, baking with the kids, or simply indulging your sweet tooth, these cookies are sure to cast a delicious spell on anyone who takes a bite. Let’s dive into this fun and easy-to-make recipe that will enchant your kitchen with its wickedly good flavors.
Ingredients
- 1 ½ cups all-purpose flour
- ½ cup unsweetened cocoa powder – for that rich chocolatey base.
- 1 teaspoon baking soda – helps give the cookies their soft, chewy texture.
- ¼ teaspoon salt
- ½ cup unsalted butter, softened – ensures your cookies are rich and buttery.
- ¾ cup granulated sugar – adds sweetness.
- 1 large egg – to bind the ingredients together.
- 1 teaspoon vanilla extract – enhances the overall flavor.
- ¼ cup milk – to keep the dough moist and soft.
- ½ cup candy-coated chocolates – in spooky green, orange, and purple for a festive touch.
- ½ cup neon green filling – optional but recommended! Use green-tinted white chocolate ganache or neon green frosting for a truly magical look.
Optional Substitutions:
- For a gluten-free option, substitute the all-purpose flour with a gluten-free flour blend.
- Dairy-free bakers can use plant-based butter and milk alternatives, such as almond milk.
Instructions
Step 1: Preheat Your Oven
Preheat your oven to 350°F (175°C) and line a baking sheet with parchment paper. This ensures the cookies won’t stick and will bake evenly.
Step 2: Mix Dry Ingredients
In a medium-sized bowl, whisk together 1 ½ cups all-purpose flour, ½ cup unsweetened cocoa powder, 1 teaspoon baking soda, and ¼ teaspoon salt. Set aside.
Step 3: Cream Butter and Sugar
In a separate bowl, using an electric mixer or by hand, cream together ½ cup softened unsalted butter and ¾ cup granulated sugar until light and fluffy—about 3-4 minutes. This step helps create a soft and chewy texture.
Step 4: Add Egg and Vanilla
Mix in 1 large egg and 1 teaspoon vanilla extract until fully combined.
Step 5: Combine Wet and Dry Ingredients
Gradually add the dry ingredient mixture to the wet ingredients, alternating with ¼ cup milk, mixing until a soft dough forms.
Step 6: Add Candy-Coated Chocolates
Gently fold in ½ cup candy-coated chocolates (green, orange, and purple). This gives the cookies their signature Halloween look.
Step 7: Shape and Add Green Filling
Scoop out dough balls (about 2 tablespoons each) and place them on the prepared baking sheet. Using your thumb, create a small indentation in the center of each cookie. Fill the indentation with a dollop of neon green filling.
Step 8: Add Extra Chocolates
Top each cookie with additional candy-coated chocolates for an extra festive touch.
Step 9: Bake
Bake the cookies for 10-12 minutes, or until the edges are firm but the centers are still soft. Allow them to cool on the baking sheet for a few minutes before transferring them to a wire rack to cool completely.
Equipment

2Pcs Heart Shape Cake Pans, Aluminum Heart Cake Mold, Reusable 10 inch
Buy Now →
Kids Chill Leak-Proof Lunch Box – Included Reusable Ice Pack Keeps Food Cold
Buy Now →Notes
- Chill the Dough: For thicker cookies, chill the dough for 30 minutes before baking. This helps the cookies maintain their shape and prevents excessive spreading.
- Filling Options: If you don’t have neon green filling on hand, you can tint some melted white chocolate or frosting with a few drops of green food coloring.
- Use Room Temperature Ingredients: For best results, make sure your butter and egg are at room temperature before starting. This ensures even mixing and a smoother dough.
- Don’t Overbake: Keep an eye on the cookies—overbaking will result in dry cookies. The cookies should still be soft in the middle when you take them out of the oven.
