Description
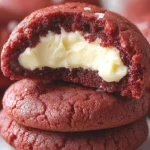
Hello, dessert lovers! If you’re searching for the ultimate indulgence, then you’ve come to the right place. Today, we’re baking Red Velvet Cheesecake Stuffed Cookies, a delightful combination of chewy red velvet cookies and creamy cheesecake filling. These irresistible cookies are perfect for any special occasion or just as a sweet treat to satisfy your cravings. Whether you’re a red velvet fan or simply love stuffed cookies, this recipe is bound to be a hit!
Ingredients
- 1 box red velvet cake mix
- 1/4 cup unsalted butter, softened
- 1/4 cup vegetable oil
- 2 large eggs
- 8 oz cream cheese, softened
- 1/2 cup powdered sugar
- 1 teaspoon vanilla extract
- 1/2 teaspoon salt
- 1 tablespoon flour (for dusting)
Dietary Substitutions:
- For a dairy-free version, substitute the cream cheese with a plant-based cream cheese alternative.
- To make these cookies gluten-free, use a gluten-free red velvet cake mix.
Instructions
Step 1: Preheat the Oven and Prepare the Baking Sheet
Preheat your oven to 350°F (175°C). Line a baking sheet with parchment paper for easy cleanup and to ensure the cookies don’t stick during baking.
Step 2: Prepare the Red Velvet Dough
In a large bowl, combine the red velvet cake mix, butter, vegetable oil, and eggs. Mix thoroughly until you have a smooth dough that is slightly sticky. This rich dough will form the base of your cookies.
Step 3: Make the Cream Cheese Filling
In a separate bowl, beat the softened cream cheese, powdered sugar, vanilla extract, and salt together until smooth and creamy. This will be the delicious cheesecake filling inside your red velvet cookies.
Step 4: Assemble the Cookies
Scoop about a tablespoon of the red velvet dough and flatten it into a disc. Place a small spoonful of the cream cheese filling in the center. Carefully fold the dough around the filling and roll it into a ball, making sure the filling is completely enclosed. This creates the perfect stuffed cookie!
Step 5: Bake the Cookies
Place the dough balls on the prepared baking sheet, leaving about an inch of space between them. Bake the cookies for 8-10 minutes or until the edges are golden and the centers are soft. This will ensure the cookies have a chewy texture with a creamy interior.
Step 6: Cool the Cookies
Allow the cookies to cool on the baking sheet for 5 minutes before transferring them to a wire rack to cool completely. This prevents them from falling apart while they’re still warm.
Equipment

2Pcs Heart Shape Cake Pans, Aluminum Heart Cake Mold, Reusable 10 inch
Buy Now →
Kids Chill Leak-Proof Lunch Box – Included Reusable Ice Pack Keeps Food Cold
Buy Now →Notes
- Tip 1: For extra flavor, you can add a teaspoon of cocoa powder to the dough for a richer chocolate taste.
- Tip 2: If you want to make these cookies even more indulgent, top them with a drizzle of cream cheese frosting after baking.
- Tip 3: Chill the dough for 30 minutes before baking to prevent the cookies from spreading too much.