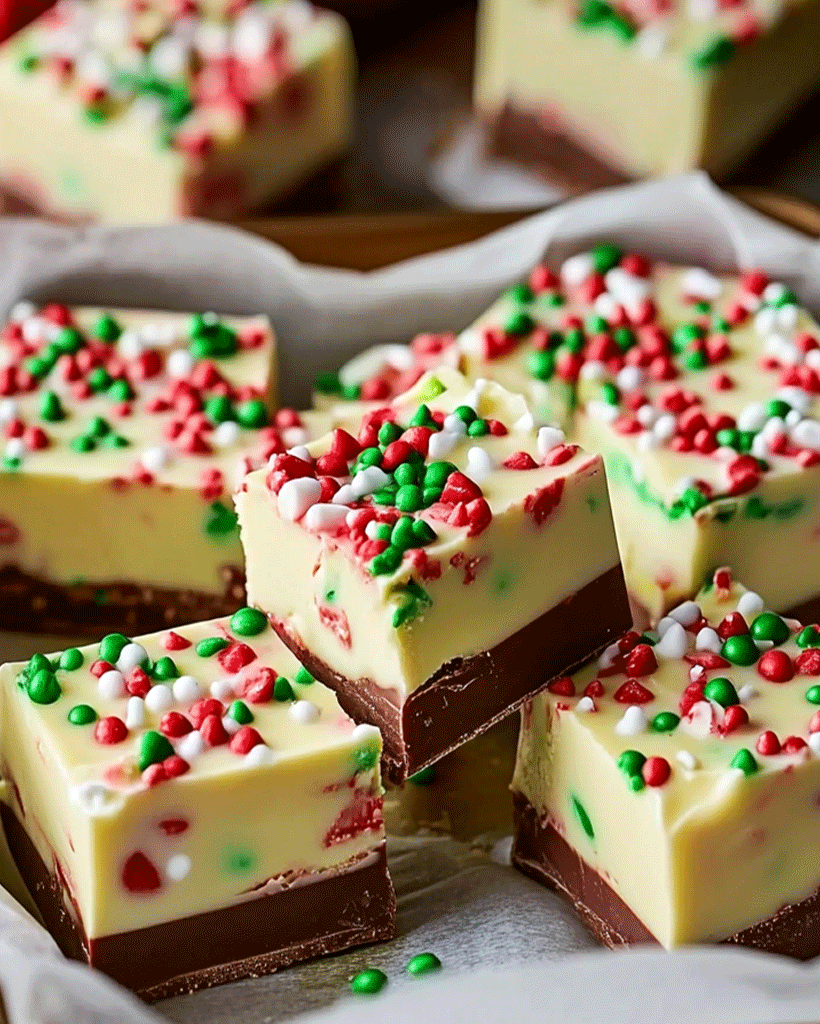
The holidays are here, and nothing says “festive” like a batch of colorful, creamy Christmas Fudge! Whether you’re gathering with family or looking for a last-minute homemade gift, this recipe is the perfect way to add sweetness to the season. Christmas Fudge is simple, fun to make, and packed with holiday cheer. Let’s dive into this delightful treat that’s sure to bring smiles to everyone’s faces.
Introduction
Christmas Fudge is more than just a dessert; it’s a tradition that brings warmth and joy to the holidays. With its vibrant layers of red, green, and white, this fudge embodies the holiday spirit. Originating from the creative kitchens of home bakers who wanted a fuss-free, no-bake dessert, this treat has become a holiday favorite. It’s not only visually stunning but also incredibly versatile, making it a must-try for anyone who loves festive, easy-to-make sweets.
Ingredients for Christmas Fudge
Here’s everything you need to make this delightful Christmas Fudge:
- 3 cups white chocolate chips
- 1 (14-ounce) can sweetened condensed milk
- 1/2 teaspoon vanilla extract
- Red and green food coloring
- 1/4 cup holiday sprinkles (optional, for decoration)
Optional Substitutions
- Use dairy-free white chocolate chips for a vegan option.
- Swap food coloring with natural alternatives like beet or matcha powder for a healthier twist.
- Add crushed peppermint candies instead of sprinkles for a festive crunch.
How to Make Christmas Fudge – Step by Step
Step 1: Prepare the Pan
Line an 8×8-inch baking dish with parchment paper, leaving extra paper hanging over the sides for easy removal. This step ensures your fudge will lift out effortlessly.
Step 2: Melt the Chocolate
Combine the white chocolate chips and sweetened condensed milk in a medium saucepan. Stir over low heat until the chocolate melts completely, creating a smooth and creamy mixture. Remove from heat and stir in the vanilla extract for an added layer of flavor.
Step 3: Divide and Color
Divide the melted chocolate mixture evenly into three bowls. Add red food coloring to one bowl and green food coloring to another, leaving the third bowl plain. Stir each bowl until the colors are evenly mixed.
Step 4: Layer the Fudge
Pour the red mixture into the prepared pan, spreading it evenly. Add the plain layer next, followed by the green layer. For a marbled effect, gently swirl the layers together using a knife.
Step 5: Decorate and Chill
Sprinkle holiday-themed sprinkles on top while the fudge is still warm. Refrigerate for at least two hours or until the fudge is firm. Once set, lift the fudge out of the pan using the parchment paper and cut it into squares.
Helpful Tips for Christmas Fudge
- Use high-quality white chocolate chips for the creamiest texture.
- To avoid graininess, melt the chocolate on low heat and stir constantly.
- For precise cuts, warm your knife slightly before slicing the fudge.
Cooking Tips for the Best Christmas Fudge
Use Fresh Ingredients
Ensure your chocolate and condensed milk are fresh to achieve the best flavor.
Experiment with Flavors
Add a few drops of peppermint or almond extract to give your fudge a unique twist.
Perfect Layering
Let each layer cool slightly before adding the next to maintain clean lines.
Serving Suggestions for Christmas Fudge
Serve your Christmas Fudge on a decorative holiday platter alongside:
- Hot cocoa topped with whipped cream.
- A festive fruit platter for a refreshing contrast.
- Mulled wine or spiced cider for adults to enjoy a cozy pairing.
Nutritional Information
Indulging in Christmas Fudge doesn’t mean you can’t stay informed about what you’re eating! Here’s a breakdown of the nutritional value:
Nutritional Info for Christmas Fudge (per serving):
- Calories: 120
- Total Fat: 5g
- Carbohydrates: 15g
- Protein: 2g
- Vitamins: Minimal amounts of calcium and iron
Storage and Leftovers for Christmas Fudge
- Refrigerator: Store the fudge in an airtight container for up to one week.
- Freezer: Freeze in a sealed container for up to two months.
- Reheating: Allow frozen fudge to thaw at room temperature for an hour before serving.
Frequently Asked Questions (FAQs) for Christmas Fudge
1. Can I make Christmas Fudge ahead of time?
Absolutely! You can prepare it up to a week in advance and store it in the fridge.
2. What if my fudge doesn’t set properly?
This could happen if the chocolate wasn’t fully melted or the layers weren’t cooled enough. Place it back in the fridge to firm up.
3. Can I use dark chocolate instead of white?
Yes! Dark chocolate creates a different flavor profile but works just as well.
4. How can I make this recipe kid-friendly?
Let kids help with the layering and decorating for a fun, family-friendly activity.
Related Recipes for Christmas Fudge Lovers
Looking for more festive treats? Check out these similar recipes:
Conclusion
There’s no better way to celebrate the holidays than with this delightful Christmas Fudge. Easy to make and perfect for gifting, it’s a recipe that brings joy to any festive occasion. Try it out and share your creations with us in the comments below. What’s your favorite holiday twist on fudge? We’d love to hear! Happy Holidays!
Print
Christmas Fudge Recipe: Easy Holiday Dessert
Description
The holidays are here, and nothing says “festive” like a batch of colorful, creamy Christmas Fudge! Whether you’re gathering with family or looking for a last-minute homemade gift, this recipe is the perfect way to add sweetness to the season. Christmas Fudge is simple, fun to make, and packed with holiday cheer. Let’s dive into this delightful treat that’s sure to bring smiles to everyone’s faces.
Ingredients
- 3 cups white chocolate chips
- 1 (14-ounce) can sweetened condensed milk
- 1/2 teaspoon vanilla extract
- Red and green food coloring
- 1/4 cup holiday sprinkles (optional, for decoration)
Optional Substitutions
- Use dairy-free white chocolate chips for a vegan option.
- Swap food coloring with natural alternatives like beet or matcha powder for a healthier twist.
- Add crushed peppermint candies instead of sprinkles for a festive crunch.
Instructions
Step 1: Prepare the Pan
Line an 8×8-inch baking dish with parchment paper, leaving extra paper hanging over the sides for easy removal. This step ensures your fudge will lift out effortlessly.
Step 2: Melt the Chocolate
Combine the white chocolate chips and sweetened condensed milk in a medium saucepan. Stir over low heat until the chocolate melts completely, creating a smooth and creamy mixture. Remove from heat and stir in the vanilla extract for an added layer of flavor.
Step 3: Divide and Color
Divide the melted chocolate mixture evenly into three bowls. Add red food coloring to one bowl and green food coloring to another, leaving the third bowl plain. Stir each bowl until the colors are evenly mixed.
Step 4: Layer the Fudge
Pour the red mixture into the prepared pan, spreading it evenly. Add the plain layer next, followed by the green layer. For a marbled effect, gently swirl the layers together using a knife.
Step 5: Decorate and Chill
Sprinkle holiday-themed sprinkles on top while the fudge is still warm. Refrigerate for at least two hours or until the fudge is firm. Once set, lift the fudge out of the pan using the parchment paper and cut it into squares.
Equipment

2Pcs Heart Shape Cake Pans, Aluminum Heart Cake Mold, Reusable 10 inch
Buy Now →
Kids Chill Leak-Proof Lunch Box – Included Reusable Ice Pack Keeps Food Cold
Buy Now →Notes
- Use high-quality white chocolate chips for the creamiest texture.
- To avoid graininess, melt the chocolate on low heat and stir constantly.
- For precise cuts, warm your knife slightly before slicing the fudge.


