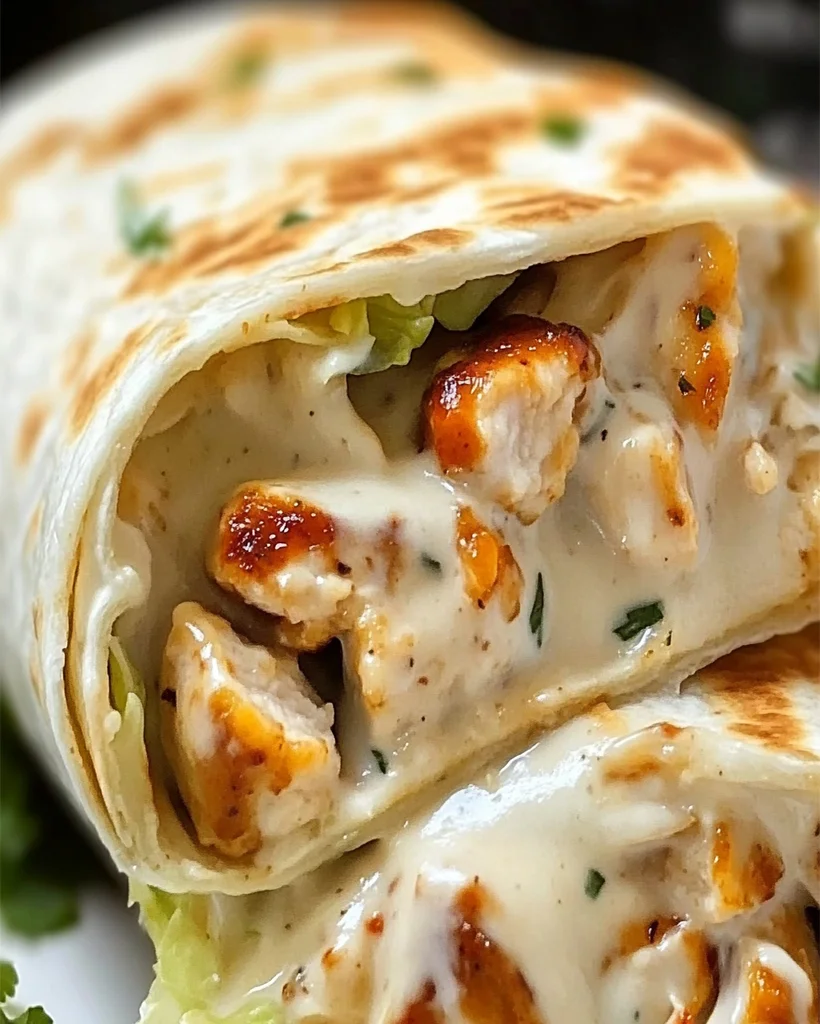
Welcome, food lovers! If you’re in search of a quick, flavorful, and cheesy meal, Cheesy Garlic Chicken Wraps are the perfect choice. These wraps, loaded with garlicky goodness and gooey cheese, make for a satisfying lunch or dinner. Whether you’re cooking for the family or just craving something delicious for yourself, this easy-to-follow recipe is sure to become your new favorite. Ready in just 25 minutes, this dish delivers on both taste and convenience.
Introduction: A Comforting Meal With a Garlicky Twist
Cheesy Garlic Chicken Wraps are a delightful fusion of American comfort food and zesty garlic flavors. Combining the richness of cheddar and mozzarella cheeses with seasoned chicken, this dish will remind you of classic cheesesteak wraps but with an exciting garlicky twist. Perfect for fans of savory, cheesy meals, these wraps are an ideal quick fix when you’re short on time but not on appetite. Whether you’re new to cooking or a seasoned chef, this recipe will make you feel like a kitchen pro!
Ingredients for Cheesy Garlic Chicken Wraps
To make these wraps, you’ll need a handful of simple yet flavorful ingredients. These staples can easily be found in your pantry, and if you need to make any substitutions, don’t worry—I’ve got you covered.
- 2 large chicken breasts, diced
- 1 tbsp olive oil
- 2 tsp garlic powder
- 1 tsp onion powder
- 1 tsp paprika
- Salt and pepper to taste
- 1 cup shredded cheddar cheese
- 1/2 cup shredded mozzarella cheese
- 4 large flour tortillas
- 1/2 cup creamy garlic sauce
- Fresh parsley, chopped (optional, for garnish)
Substitution Ideas:
- Allergy Alert: For those with lactose intolerance, try swapping out the cheese with a dairy-free alternative like vegan cheddar or mozzarella.
- Low-Carb Option: Replace the flour tortillas with low-carb wraps or lettuce leaves for a healthier alternative.
How to Make Cheesy Garlic Chicken Wraps – Step by Step
Follow these easy steps to whip up your delicious wraps in no time. Each step is designed to ensure you get the best flavor and texture.
Step 1: Season the Chicken
In a medium-sized bowl, add the diced chicken and season with olive oil, garlic powder, onion powder, paprika, salt, and pepper. Toss everything together to ensure the chicken is evenly coated.
Step 2: Cook the Chicken
Heat a large skillet over medium heat. Add the seasoned chicken to the skillet and cook for 6-8 minutes until it is browned and fully cooked through. Stir occasionally to avoid burning.
Step 3: Prepare the Tortillas
While the chicken is cooking, spread a generous layer of creamy garlic sauce onto each flour tortilla. This sauce adds extra garlicky flavor and creamy texture, making the wraps irresistible.
Step 4: Add the Filling
Once the chicken is cooked, divide it evenly among the tortillas. Sprinkle shredded cheddar and mozzarella cheese over the chicken. The combination of these two cheeses creates the perfect melt-in-your-mouth experience.
Step 5: Toast the Wraps
Fold the tortillas over the filling, creating a neat wrap. Place the wraps back in the skillet and cook for 2-3 minutes on each side until the tortillas are golden and crispy, and the cheese has melted.
Step 6: Serve and Enjoy!
Remove the wraps from the skillet and slice them in half. Garnish with freshly chopped parsley, if desired, and serve immediately while they’re hot and cheesy.
Helpful Tips for Cheesy Garlic Chicken Wraps
- Fresh Garlic: If you love the bold taste of garlic, feel free to add fresh minced garlic to the chicken while cooking. It will elevate the flavor even more.
- Crispy Tortillas: For an extra crispy wrap, brush the outside of the tortillas with a little olive oil before toasting them in the skillet.
- Storage Tips: If you have any leftover wraps, wrap them tightly in foil and store them in the fridge for up to two days. Reheat them in the oven at 350°F for about 10 minutes, and they’ll be as good as new!
Cooking Tips for the Best Cheesy Garlic Chicken Wraps
- Use a Cast Iron Skillet: For a more even cook and better browning, use a cast iron skillet when cooking the chicken and toasting the wraps.
- Cheese Melting Tip: Cover the skillet with a lid during the last minute of toasting to help the cheese melt completely without burning the tortillas.
- Spice It Up: If you prefer a bit of heat, add a pinch of cayenne pepper to the chicken seasoning, or drizzle some hot sauce over the finished wraps.
Serving Suggestions for Cheesy Garlic Chicken Wraps
Cheesy Garlic Chicken Wraps are delicious on their own, but if you’re looking to round out the meal, here are some perfect pairings:
- A side of crispy sweet potato fries complements the cheesy richness of the wraps.
- Serve with a light mixed greens salad for a balanced and refreshing contrast.
- For a complete meal, pair with a glass of iced lemonade or a cold beer to refresh your palate.
Nutritional Information
Cheesy Garlic Chicken Wraps are not only tasty but also provide a good balance of protein, fats, and carbs, making them a filling meal.
- Calories: 450 kcal
- Fats: 25g
- Carbohydrates: 40g
- Protein: 30g
- Vitamins: Rich in Vitamin A and Calcium
Storage and Leftovers for Cheesy Garlic Chicken Wraps
If you find yourself with leftovers, follow these tips to ensure your wraps stay fresh and delicious:
- Refrigeration: Store the wraps in an airtight container or tightly wrapped in foil in the fridge for up to two days.
- Freezing: You can also freeze the wraps for up to a month. Just be sure to wrap them tightly in plastic wrap and foil to prevent freezer burn.
- Reheating: For the best texture, reheat in the oven at 350°F until warmed through. Avoid the microwave, as it may make the tortillas soggy.
Frequently Asked Questions (FAQs) for Cheesy Garlic Chicken Wraps
Can I Make These Wraps Ahead of Time?
Yes! You can prepare the chicken and store it in the fridge for up to two days. When ready to serve, simply assemble the wraps and cook as instructed.
What Can I Use Instead of Flour Tortillas?
If you’re avoiding gluten or carbs, use corn tortillas or lettuce wraps as a substitute. They still taste delicious and provide a different texture.
Can I Use Other Types of Cheese?
Absolutely! Feel free to swap out the cheddar and mozzarella for cheeses like pepper jack, provolone, or even gouda for a richer flavor.
Are These Wraps Kid-Friendly?
Yes! These wraps are perfect for kids, especially if they love cheesy meals. You can even let them customize their wraps with different toppings like sliced avocado or sour cream.
Related Recipes for Cheesy Garlic Lovers:
Looking for more cheesy, garlicky goodness? Check out these other delicious recipes from Optimal Recipes:
- Cheesy Pesto Chicken Garlic Baguettes
: A perfect appetizer or meal, loaded with cheesy chicken and savory pesto.
- Smoky BBQ Chicken Jalapeño Pizza
: For those who love a smoky, cheesy twist, this pizza will hit the spot.
Conclusion: Try Cheesy Garlic Chicken Wraps Today!
Now that you have everything you need to create these delicious Cheesy Garlic Chicken Wraps, it’s time to hit the kitchen and give this recipe a try. I guarantee these wraps will become a family favorite. Don’t forget to share your feedback and any personal variations you made in the comments below. Happy cooking!
Print
Cheesy Garlic Chicken Wraps Recipe – Quick & Easy 25-Minute Meal
Description
Welcome, food lovers! If you’re in search of a quick, flavorful, and cheesy meal, Cheesy Garlic Chicken Wraps are the perfect choice. These wraps, loaded with garlicky goodness and gooey cheese, make for a satisfying lunch or dinner. Whether you’re cooking for the family or just craving something delicious for yourself, this easy-to-follow recipe is sure to become your new favorite. Ready in just 25 minutes, this dish delivers on both taste and convenience.
Ingredients
- 2 large chicken breasts, diced
- 1 tbsp olive oil
- 2 tsp garlic powder
- 1 tsp onion powder
- 1 tsp paprika
- Salt and pepper to taste
- 1 cup shredded cheddar cheese
- 1/2 cup shredded mozzarella cheese
- 4 large flour tortillas
- 1/2 cup creamy garlic sauce
- Fresh parsley, chopped (optional, for garnish)
Substitution Ideas:
- Allergy Alert: For those with lactose intolerance, try swapping out the cheese with a dairy-free alternative like vegan cheddar or mozzarella.
- Low-Carb Option: Replace the flour tortillas with low-carb wraps or lettuce leaves for a healthier alternative.
Instructions
Step 1: Season the Chicken
In a medium-sized bowl, add the diced chicken and season with olive oil, garlic powder, onion powder, paprika, salt, and pepper. Toss everything together to ensure the chicken is evenly coated.
Step 2: Cook the Chicken
Heat a large skillet over medium heat. Add the seasoned chicken to the skillet and cook for 6-8 minutes until it is browned and fully cooked through. Stir occasionally to avoid burning.
Step 3: Prepare the Tortillas
While the chicken is cooking, spread a generous layer of creamy garlic sauce onto each flour tortilla. This sauce adds extra garlicky flavor and creamy texture, making the wraps irresistible.
Step 4: Add the Filling
Once the chicken is cooked, divide it evenly among the tortillas. Sprinkle shredded cheddar and mozzarella cheese over the chicken. The combination of these two cheeses creates the perfect melt-in-your-mouth experience.
Step 5: Toast the Wraps
Fold the tortillas over the filling, creating a neat wrap. Place the wraps back in the skillet and cook for 2-3 minutes on each side until the tortillas are golden and crispy, and the cheese has melted.
Step 6: Serve and Enjoy!
Remove the wraps from the skillet and slice them in half. Garnish with freshly chopped parsley, if desired, and serve immediately while they’re hot and cheesy.
Equipment

2Pcs Heart Shape Cake Pans, Aluminum Heart Cake Mold, Reusable 10 inch
Buy Now →
Kids Chill Leak-Proof Lunch Box – Included Reusable Ice Pack Keeps Food Cold
Buy Now →Notes
- Fresh Garlic: If you love the bold taste of garlic, feel free to add fresh minced garlic to the chicken while cooking. It will elevate the flavor even more.
- Crispy Tortillas: For an extra crispy wrap, brush the outside of the tortillas with a little olive oil before toasting them in the skillet.
- Storage Tips: If you have any leftover wraps, wrap them tightly in foil and store them in the fridge for up to two days. Reheat them in the oven at 350°F for about 10 minutes, and they’ll be as good as new!


