Description
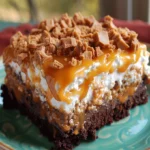
Hey there, sweet treat lovers! Are you in the mood for a dessert that’s bursting with rich chocolate, creamy caramel, and crunchy Butterfinger goodness? Well, you’re in for a treat! Today, we’re diving into an easy and irresistible Butterfinger Candy Bar Poke Cake recipe that will satisfy your candy bar cravings and more. Perfect for any occasion, from potlucks to family dinners, this decadent cake is sure to be the talk of the table. Let’s get baking, shall we?
Ingredients
- 1 box of chocolate cake mix (plus ingredients listed on the box: eggs, oil, and water)
- 1 can (14 oz) sweetened condensed milk
- 1 jar (12 oz) caramel sauce
- 1 container (8 oz) whipped topping (such as Cool Whip), thawed
- 4–5 Butterfinger candy bars, crushed
Optional substitutions:
- For a gluten-free option, use a gluten-free chocolate cake mix.
- Dairy-free whipped topping and plant-based caramel sauce can be used for lactose intolerant or vegan versions.
Instructions
Step 1: Bake the Cake
Prepare your chocolate cake mix according to the package instructions. Use a 9×13-inch baking dish to ensure even baking. Once the cake is baked and has cooled for about 10 minutes, it’s time to make those signature pokes! The slightly warm cake is the ideal temperature to absorb the fillings.
Step 2: Poke the Cake
Take the handle of a wooden spoon and gently poke holes throughout the surface of the cake. Make sure the holes are spaced evenly and are deep enough to reach the base of the cake. The holes should be large enough to allow the caramel and condensed milk to seep through and infuse the cake with flavor.
Step 3: Add Caramel and Condensed Milk
In a small mixing bowl, combine the sweetened condensed milk with the caramel sauce. Pour this mixture slowly and evenly over the cake, ensuring that it fills the holes you’ve just made. The cake will absorb this sweet and rich filling, creating an irresistible texture.
Step 4: Let the Cake Cool
Once the cake is thoroughly soaked with the caramel mixture, let it cool completely. This step is crucial to ensure that the whipped topping doesn’t melt when applied. Cooling also allows the flavors to meld together beautifully.
Step 5: Top with Whipped Topping
Once the cake has cooled, spread the thawed whipped topping evenly across the surface of the cake. The creamy topping adds a light, airy contrast to the dense, moist cake beneath.
Step 6: Add Crushed Butterfinger
Now for the pièce de résistance! Crush 4-5 Butterfinger candy bars and sprinkle them generously over the whipped topping. The combination of caramel, chocolate, and crispy Butterfinger pieces adds the perfect crunch to this dessert.
Step 7: Chill and Serve
Refrigerate the cake for at least an hour to allow it to set and the flavors to develop fully. Once it’s chilled, slice it up, serve, and enjoy this delightful creation!
Equipment

2Pcs Heart Shape Cake Pans, Aluminum Heart Cake Mold, Reusable 10 inch
Buy Now →
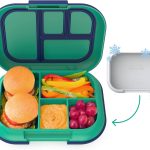
Kids Chill Leak-Proof Lunch Box – Included Reusable Ice Pack Keeps Food Cold
Buy Now →Notes
- Chill the cake: Make sure to give the cake enough time to cool in the refrigerator before serving. This helps to enhance the flavors and create a well-set dessert.
- Crush the Butterfinger bars finely: For the perfect crunchy texture, crush the candy bars into smaller pieces. You can use a rolling pin or a food processor to achieve your desired consistency.
- Use different candy bars: Not a Butterfinger fan? You can substitute with other candy bars like Reese’s, Snickers, or Heath bars for different flavor profiles.
